While the kiln is "cooling" (it just shut off around 1 pm, so it seems to be hot as ever....), and the paint on the little tables is drying, I'll post some watercolors I've done, and which were used, this kiln decorating session, as inspiration. Watercolor is closest to the process of decorating for maiolica as any type of painting; I have heard maiolica decoration described as painting with watercolors on dusty blotter paper. In addition, the colors are dustier and paler than they will be after the glaze firing, so it's sometimes difficult to know exactly how something is going to look (back at the beginning of the blog, 1 1/2 years ago, I posted some before and after pix of my intern student, Meghan's work---as an example). Here are two of the watercolors: daylillies, and the pool at Julliana's where I have been swimming this summer---
Sunday, August 29, 2010
Sunday, and the studio is really hot!
While the kiln is "cooling" (it just shut off around 1 pm, so it seems to be hot as ever....), and the paint on the little tables is drying, I'll post some watercolors I've done, and which were used, this kiln decorating session, as inspiration. Watercolor is closest to the process of decorating for maiolica as any type of painting; I have heard maiolica decoration described as painting with watercolors on dusty blotter paper. In addition, the colors are dustier and paler than they will be after the glaze firing, so it's sometimes difficult to know exactly how something is going to look (back at the beginning of the blog, 1 1/2 years ago, I posted some before and after pix of my intern student, Meghan's work---as an example). Here are two of the watercolors: daylillies, and the pool at Julliana's where I have been swimming this summer---
Saturday, August 28, 2010
It's Saturday Night in the Provinces, (with an apology to Utah Phillips.....

Monday, August 23, 2010
I'm back from the Woodland Fair in Lexington, KY, and---
after a day of doing office work, am ready to start decorating more of the pottery that's ready for me out in the studio. I have orders of pie plates, pasta bowls, mugs, and casseroles, most of which are waiting for the final stage: decoration. Last week the wild cherries outside my studio window were my inspiration---here are some early stages of the decoration process.
Monday, August 16, 2010
yikes, it's August!
So------hmmm, time flies! and It's been hot---and stray kitties are on the roam--Here's Fritzie, on the left, who is temporarily staying with us while we get him 'fixed' up, (with the help of Pete and Amy), and find a permanent home for him! We're also a refuge to many little bugs; Bruce photographed one resting on the drying laundry. (see sidebar on right, top) Out in the studio, I'm working on another glaze kiln----with some new shapes to keep me happy. I received a large oval wooden dish from Edith, and am using it for a footed pasta dish!
Tuesday, June 8, 2010
Fair season begins for the Tubbs Studio
The Old West End Fair was this last weekend, with the art fair section taking a stand on the grassy grounds surrounding the TMA Glass Building. Saturday night's weather was devastating for some (rain and high winds, and several people killed on the east side of Toledo! and locally: tents at the art fair destroyed), but we opened up the booths on Sunday, and straightened things out as best we could. Here are Molly and Kelly Savino, and Edith Franklin, on Saturday, in my booth.
Thursday, June 3, 2010
thie fired version of the mask
Here is the fired mask, with maiolica additions. Some of the images on the bottom right are from sketches I made in Italy several years ago. The clay body is a high fire stoneware which I would have rakued, or cold smoked, but decided to save for other possibilities.
Tomorrow I am off to set up at the Old West End Fair for this weekend; Sheri Bieber is helping me set up tomorrow, and I will be at the fair Saturday and Sunday. It's the first fair of the season. I think I would rather be in the studio decorating bowls for the next kiln firing......but I love being able to talk to people at the fair! I have gotten all the pots into boxes, with Sheri's help, and now have the boxes loaded into the van. (along with the tent, shelves, tool kit, tent weights and stakes, merchant services paperwork, newspaper and sacks for wrapping all those sales!. display aids. signage, etc., etc. Meanwhile, I listen to the latest efforts of BP oil to cap or control the oil gushing in the Gulf. My job is miniscule compared to that.
Monday, May 24, 2010
diversionary tactics
Wednesday, April 21, 2010
spring sniffles, and little vases
For the next few weeks I'm going to be working on forms which I made a number of years ago, and, out of the series, kept the one I most liked (either because it was one of the beginning forms, and has the energy of my trying to figure out what I could do with the shape, or because it came out of the firing with it's own sense of "being" (?), and which I thought might lead me into further exploration. The first of these shapes is a little bud, or tulip vase, shown, here, with flowers, and with some of the first new variations, still at the leather hard, or drying stages.

Unfortunately, I've caught a spring cold, and am sniffling and blowing my nose incessantly, so my concentration is not the best. Almost time to empty the sack of used tissues.....

Unfortunately, I've caught a spring cold, and am sniffling and blowing my nose incessantly, so my concentration is not the best. Almost time to empty the sack of used tissues.....
Wednesday, April 14, 2010
using clay to cut dies for the extruder
I've just been cutting more dies for my 4" Brent extruder barrel. I roll out a fairly thick slab of clay, about 1/2" thick, and then cut a circle which is slightly larger that the 2-handled die holder, made of aluminum in the first picture. After the clay circles have dried to leather-hard, and using brass hole cutters, I 'outline' the form which will be the hole through which the clay will pass, and then I 'connect the dots (holes)" to make the opening. In the second photo, you can also see the back side, --the side which the clay hits first--, which has been opened up more with a bevelling cut around the hole, allowing the clay to pass across a more refined line as it exits the die/extruder. I fire the dies to cone 2 (and am using Rovin's RO82m clay body). The strength of the clay allows me to use the die over and over, and the ease of making a new die is so accessible that I can do one in relatively short time. (the little 'D' shapped die in the first photo was made from some scrap clay I didn't want to throw away. With the large metal washers I can block off the open area so that only the small opening is used for the extrusion.)
Monday, April 12, 2010
cutting hardie backer board or durock for the tile base in a metal table
Saturday, April 10, 2010
New Hexagonal Tile Cutter's Production
Here are the tiles, hexagonal, with one little diamond one filling in the front edge space-----cut and drying on the old pieces of sheetrock (gypsum board), which had been duct-taped around the edges. I stack the sheetrock and tiles up, ending with a final board covering the tiles, so they will dry flat. Using the tile cutter also helps keep the tiles flat since I don't have to roll the tile up off of the cloth/table to release it. If I am cutting more of a puzzle-style set of tiles, I can slip the set, still on the thin sheeting, off of the piece of granite I use for a flat rolling surface, and onto a piece of sheetrock, cover with another piece of dry-ish sheetrock, and let it get to leatherhard before I do the final puzzle cutting and pulling the clay off the sheeting. (too many sheets, sheesh!)
I think I may tile the old Steelcase desk (that's Peter's, but is in my studio,) just to try out the effect. And I may also try the beeswax/mineral oil finish, which I did on a square plate, recently, instead of a glaze. (I've been looking at old French tiled floors.) I used to have the pugmill on the desk, but have moved it over to a workbench, next to the extruder, so there's not that much weight on the desk right now. Except for Paulie, now and then. Diet time for kitties.
Coming up, I'll show some images of the dies I make out of clay, for the 4" Brent extruder barrel.
Tuesday, April 6, 2010
comment from Randy---thanks!
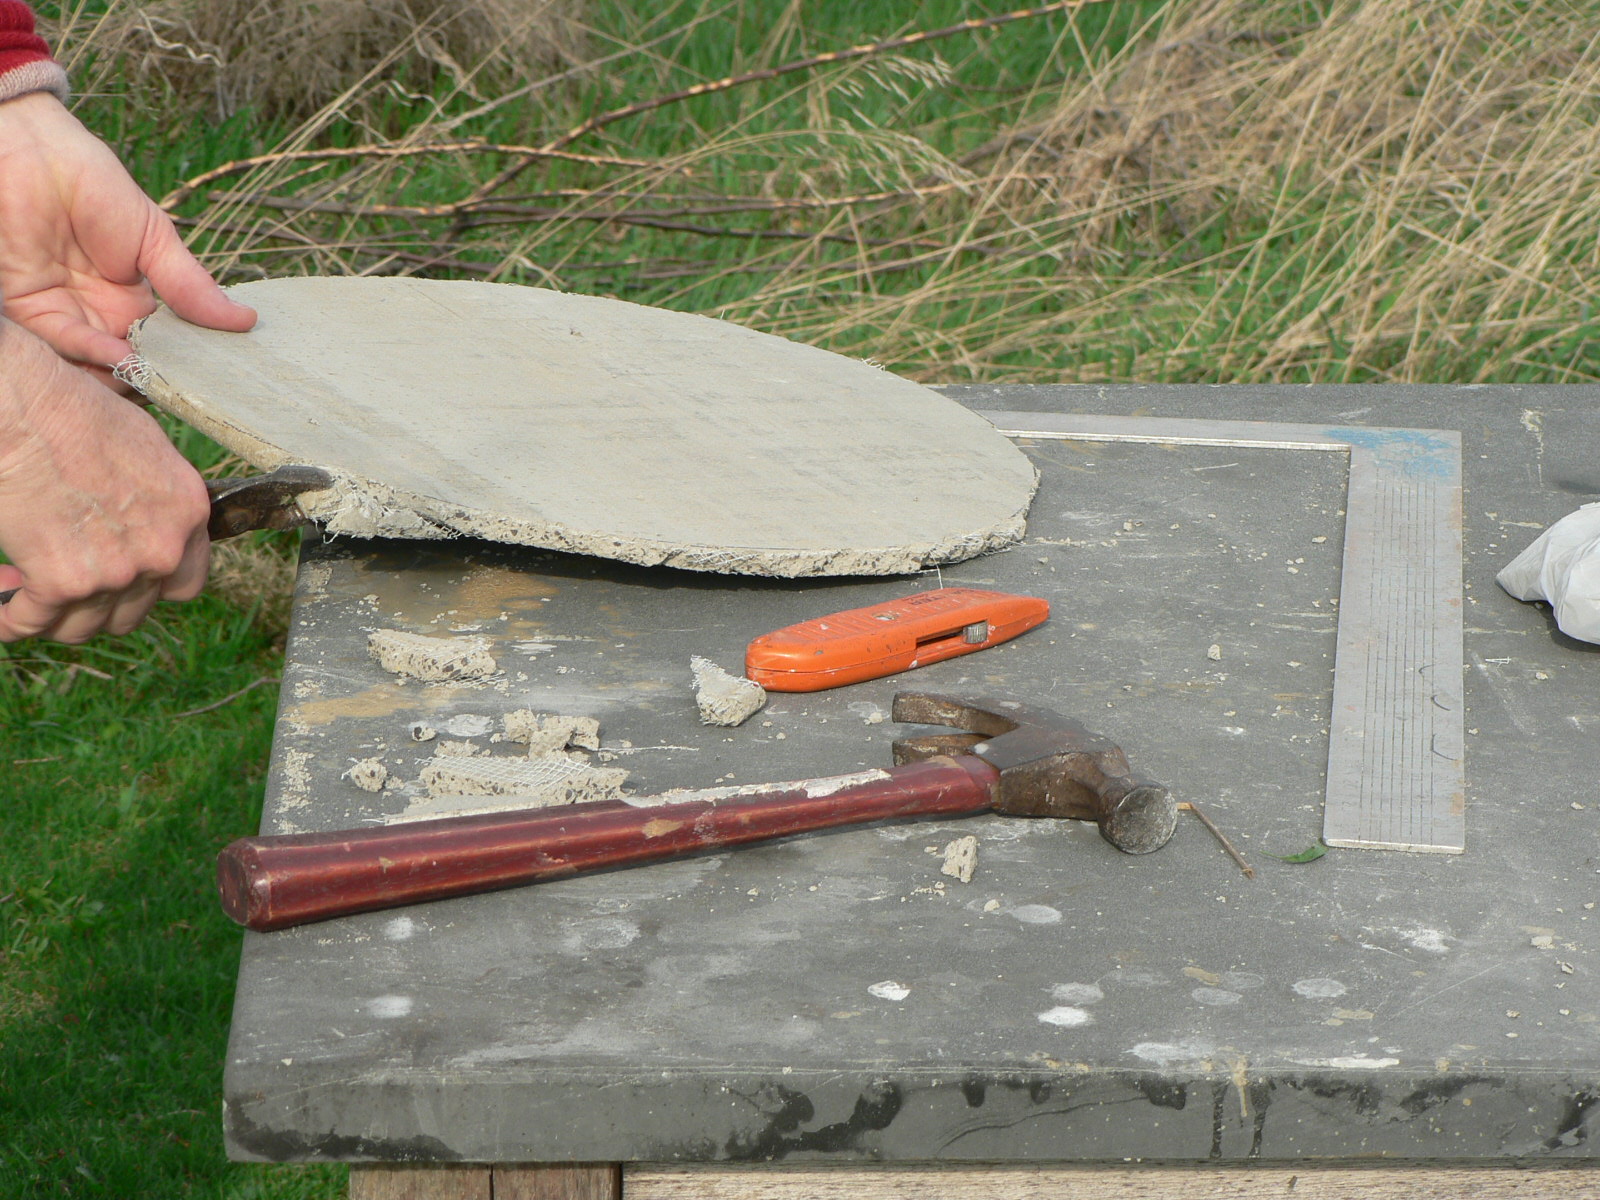
thanks for your idea of doing a hexagonal table, Randy (I haven't figured out how to post comments, yet, but will). I, too, while having lunch out on the porch yesterday, had a brainstorm, since I have a table base which has a triangular top, onto which I was going to put a circle top, cut from the silica-based handyboard---3/4", (not the durock cement board, 3/4 inch, with the fiberglass imbedded. ) And, quite frankly, cutting a circle is a pain, ---I have to cut a lot of straight lines and then take a tile cutter or plier and nip off the uneven parts) so--while chewing on whatever was my clean-out-the-fridge lunch, I thought, hmmm, I could simply make a lot of hex tiles, filling in the spaces along the outer edges with the diamond shaped tiles, fire them all, take the measurements, and then make a hexagonal table, which would mean that I could cut and break straight edges for the hex table, and not have to try to cut a circle! Thanks, again, to Randy,--I really believe that there are a LOT of really smart people out there, and that, together, we can figure out all sorts of things... (like health care?)
The next post will show the hex tiles, drying on old pieces of sheetrock (drywall), and then (ta da!) I will show the clay dies for my 4" Brent extruder, which I make from the same red clay I am using for the pots, fired to a cone 2, (pots and dies), out of which I can extrude edge tiles (nose tiles). I am pressed to keep on track, here, since Bruce is showing me youtube feeds on his computer that show how many potatoes can be taken out of an area (a whole truck load in three minutes),--go to Magic Valley, Idaho, and go to the 'airport', and then go to google maps, and then go to regional airport at Twin Falls.....He's doing a unit for his 5th-6th graders using Michael Pollen's The Omnivore's Dilemna. Aughhhhhhhhhhh (OK, I digress: the next post shown above will be the crop circles, for the irrigation of potatoes in Idaho)..........
Monday, April 5, 2010
tile cutters
I recently bought another tile cutter from Georgie's--a hexagonal one, and am cutting tiles for tables with it. Because the plunger plate is metal, I usually add a piece of luann plywood which I glue to the face plate, and which then makes the release of a wet clay tile easier. The first tile cutter I had (4 inch square--from back in the '70's) did not plunge the tile out beyond the frame of the cutter, so, until I glued that thin piece of wood onto the plate, I could not get the clay off. [top photo, plunged all the way out.] These are photos I used to write a letter to the helpful hints section of Ceramic Monthly. More photos of the hex cutter and drying tiles to follow.
Wednesday, March 31, 2010
First dinner outside, on the porch
The first dinner outside on the porch's tiled table, after winter's storms, and a clearing up of the yard day.....a quick and dirty fixing of Annie's organic pasta, with those funny, roundy carrots, steamed, --- and fresh snips of shallot greens. Orange and yellow.
Sunday, March 28, 2010
Glazed work is done; new work started.
Sunday, January 17, 2010
Pots at the gallery in Red Lodge, Montana
In December, I sent several boxes out to the gallery at Red Lodge, in Montana--here's the link to the gallery's web site, and the page of my work.
Tuesday, January 5, 2010
Thursday, December 31, 2009
Yunomi for AKAR
Wednesday, December 30, 2009
Yunomi, glazed.
Once the tea bowls are glazed, I begin thinking about all the ways I'd wanted to decorate them--a little brainstorming---more photos of the decorating to come.
Sunday, December 27, 2009
Wednesday, December 23, 2009
Sunday, December 20, 2009
Yunomi
Monday, December 14, 2009
Saturday, December 12, 2009
In 1958 I was given a penpal from Finland! Her name was Raija and she was studying English; I, French. We wrote to each other steadily for ten years, through high school, college, and her marriage and birth of two sons, while I went to graduate school. In the following thirty years, we lost track of each other, until Bruce received a grant from the school where he was teaching, so that he could travel to the International Horn Symposium in Lahti, Finland. I wondered (since I was going to go with him) whether or not I would be able to find Raija again. When I wrote to her old address, she was still there! We were able to visit with her during our trip in 202, and we continue to write. She has recently retired and has been drawing, more. Over the summer she sent me a postcard with her artwork, which I then put onto a tile, now on it's way to Helsinki.
Sunday, December 6, 2009
WHEW!
Sunday, November 29, 2009
Kiln Accident...
One of the carrots tipped over during the firing, and rested on the adjacent shelf, simultaneously adhering to the nearby pitcher. We served miso gravy in it Friday evening, and various names came up (gravy with a carrot on the side--Ted Ligibel's addition). The carrot's perfect horizontal alignment (though something that could be arranged if the carrot had been attached at the leatherhard stage) is a fluke, but amusing....Usually, kiln accidents are much more dramatic, and unforgiving. The rest of the carrots, after the firing, are resting in a narrow casserole.
Saturday, November 28, 2009
Sunday, November 22, 2009
Saturday, November 21, 2009
Unloading the bisque kiln
On Sunday, I'll be unloading the last bisque kiln before the holiday sale: more platters, covered containers, and some work done by Sheri's three boys, plus anything else I could fit in. Carrots for the rabbits, mugs, etc.---photos to follow, tomorrow. Meanwhile, here's a picture of Blue, my friend Barbie's miniature horse--he's quite special!
Subscribe to:
Posts (Atom)