
Saturday, September 28, 2013
summer fairs are over
Tuesday, August 13, 2013
a great honor!

Friday, July 12, 2013
I'm showing at the Original Art Fair in Ann Arbor!
and here is the link to copy and enter in your browser: https://workspaces.acrobat.com/?d=Bi8tCY0JmZALgV*MnZk8jQ
or the link to click on:
Ann Arbor Original Art Fair, booth A-257
I am by the bell tower, Booth A-257, on Ingalls Mall, between E. Washington, and North University. The Fair runs from the 17th of July through the 20th; hours are: W - F: 10 - 9, and Saturday: 10 - 6. See you There!
or the link to click on:
Ann Arbor Original Art Fair, booth A-257
I am by the bell tower, Booth A-257, on Ingalls Mall, between E. Washington, and North University. The Fair runs from the 17th of July through the 20th; hours are: W - F: 10 - 9, and Saturday: 10 - 6. See you There!
Thursday, June 6, 2013
So, Finally, I got my kiln rewired!...

So, Finally, I got my kiln rewired!! And it wasn't really all that hard. (Remember how bad it used to be? Elements looping down along the inside wall, totally out of their grooves? It was still reaching temperature, until that fateful firing during Art-O-Matic in Toledo this spring......) So I finally ordered the replacement parts to do the entire set of 6 elements (but not the switches--they were fine) I also ordered a replacement kiln sitter ceramic sleeve. They came from Runyan Ceramics in Clio, Michigan. When they came, I set aside a day to work on the kiln. It all went very well (and thanks to Paul at Runyan's for the technical advice!) I just wasn't able to cut off the end of the loops on each end of each element, nor crimp the sleeve that goes over the element wiring and the wiring to the switch, connecting the two. So, I got Bruce to do that for me (though I understand, from my friend Robert Rueger, who roasts coffee and sells it at the Toledo Symphony, that there are $150 ratcheting crimpers which would do the job very nicely, without the bone-crunching effort.) Now the kiln not only looks good; it fires like greased lightening.
Sunday, April 28, 2013
demi-lune, in progress


Tuesday, April 16, 2013
Yunomi Invitational--more to come--opens on Friday, 19 April 2013

4/19/2013 - 5/17/2013
2013 Yunomi Invitational
(ONLINE ONLY) 200 Potters, 5 Yunomi each for AKAR's 2013 cup show. Donations to Studio Potter Magazine.
the show is open, now, and work is selling!
2013 Yunomi Invitational
(ONLINE ONLY) 200 Potters, 5 Yunomi each for AKAR's 2013 cup show. Donations to Studio Potter Magazine.
the show is open, now, and work is selling!
Wednesday, March 20, 2013
a landscape tile--a second look

In the early evening, as the sun is going down, and the light through the west windows is warm and encouraging, I sometimes sit in the old chair that my dad used to sit in (with his kitty, Gus, who now lives with Janet Kelman) and share a glass of wine with Bruce, and take a moment to reflect on what I'm doing, and at such a breakneck pace. I often miss seeing things that I might really like, but for the fact that they didn't sell last season, and are now hanging on the wall just opposite the chair, and, hmmmm.....so I have the chance to take another look.
Monday, February 18, 2013
Oval forms: final finishing work-----Part three
 |
| a. smoothed and ready for the handles |
Then I pull long coils, and twist two together. Two lengths are cut simultaneously, so that they will be even, and with a little vinegar I add them to either end of the casserole form (illustration 'b'). These are the 'braided' handles.
 |
| b. adding the handles |
 |
| the finished leatherhard form |
 |
| c. the under side of the casserole, which is glazed and decorated.. |
Tuesday, February 12, 2013
Oval Forms; slab-built: part two
 |
| cutting out the patterns |
 |
| bevelling the edge |
Once I've tested the patterns with an actual clay trial form, and know that the patterns are going to work, I roll out a clay slab, flipping the slab over each time I roll it. To keep the slab even, I use two 1/4 inch dowels on either side, like train tracks, on which the rolling pin can roll. The table surface is a piece of granite, smooth, and slightly absorbant. The sheeting (part polyester--doesn't wrinkle as much....) makes it easier to lift the slab, each time it's rolled out, so that I can flip it over before I roll it out, again. Then I cut as many forms out of one slab as I can fit--I hate having to recycle the slabs if I don't have to! The oval base goes into the bottom of the plaster mold, and its outer edges are pressed and thinned once the base is in place. The side pieces get a bevel cut at each end, where the ends will overlap each other. The top edge of the curved side piece is smoothed, now, as well.
 |
| placing the cut shapes into the mold |
Once all the pieces are in place, (I scrub the areas to be joined with a toothbrush dipped in vinegar) they're smoothed down, and pressed against the bottom and side with my fingers. I also put a soft coil around the oval, at the inside base of the piece, and up the sides at
the joining of the two sides.
 |
| fitting the side pieces on top of the base |


Sunday, February 10, 2013
Oval forms; slab-built
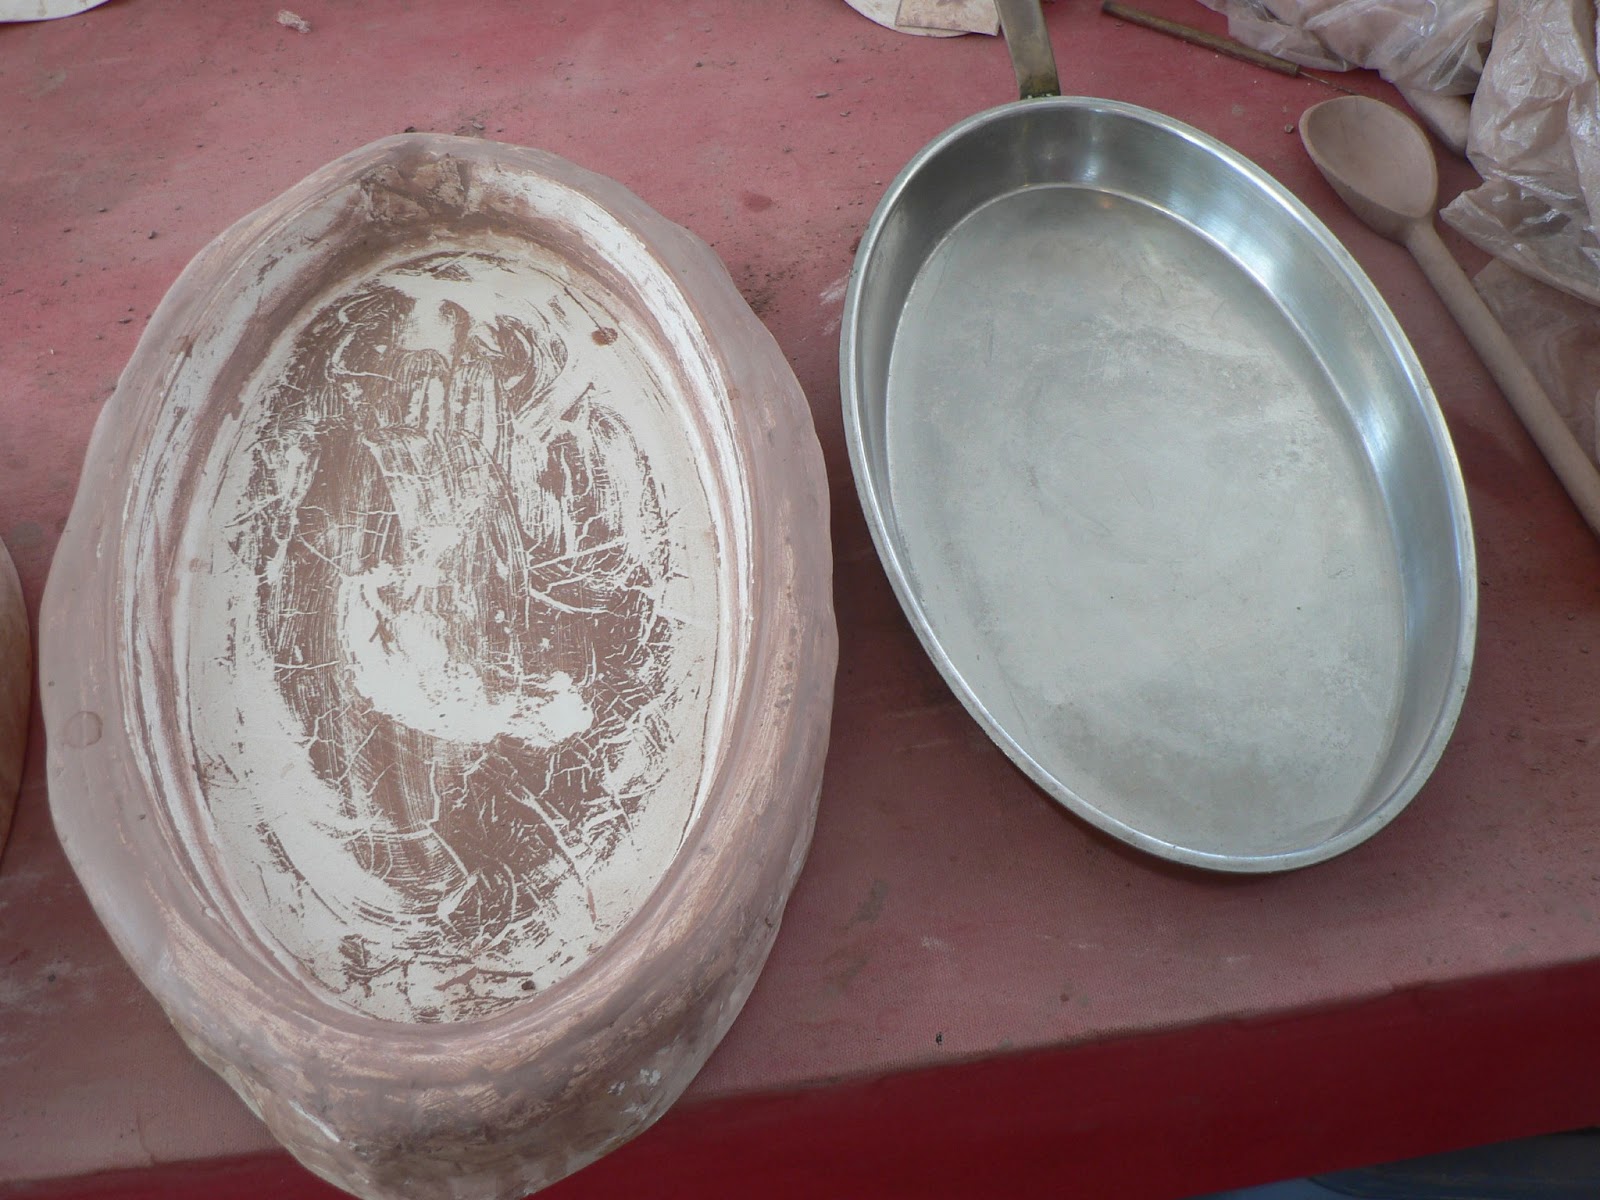 |
| this first form was cast from a flat pan (seen to the right) |
 |
| some of the oval shapes I work with; the one on the right is the commercially made mold |
In order to make the patterns, I first work with a lightweight paper like newsprint. To start, I push a slightly larger oval piece of paper into the bottom of the mold. Then I run my fingers around the outer edge of what I perceive to be the bottom until I can see where to cut the oval base shape. Then I take a pencil and draw the cutting line, and then cut the shape, itself. I then do the same thing with one-half of the side. The shape of the side is something like the shape of a lampshade that is laid out on a flat surface. It's like a rhomboid (OK, not really, but...) with a curved top and bottom edge. These first thin paper patterns are done on a trial basis, and, after using them to cut out the initial clay forms, and after pressing the clay forms into the plaster mold, adjustments can be made so that the pieces fit together more precisely. The third image, here, below, shows the final patterns, (along with one of the finished and fired pieces). The final pattens are made from a sort of plastic paper: impossible to tear, and fairly easy to cut with sharp scissors. It was 'paper' given to me when I was a den mother for Pete's cub scout group. I was never able to figure out what to do with it with the boys, but, years later, I discovered that it made good patterns for cutting out clay shapes. It's strong enough to be laid on wet clay without wrinkling up, and strong enough to have a needle tool run around its outside edge, over and over, without distorting. In the next post, I'll show how the clay is cut and placed into the plaster mold.
 | ||||
| Here is the mold (which I call 'long'), with its patterns, and with the finished pot |
Saturday, February 2, 2013
mid-winter gallery displays, part 2---
 |
| The American Gallery |
Sunday, January 27, 2013
a new shape
 |
| the new plate shape |
Friday, January 25, 2013
patterns for inspiration--from Alisa


Monday, January 21, 2013
Mid-winter gallery displays, part 1
 |
| my work on the beautiful cherry table at the Hudson Gallery, downtown Sylvania, OH www.hudsongallery.net |
Tuesday, January 1, 2013
 |
| demi-lune finished in late November, 2013 |
Subscribe to:
Posts (Atom)