 |
| pepper platter, peppers: September, 2015 |
Saturday, September 26, 2015
new decoration (from old ideas--)


Wednesday, June 17, 2015
only two fairs, this summer!
Time for a break! I will only do two fairs, this summer, and the first is fast approaching! It is the Crosby Gardens Festival, at the Toledo Botanical Gardens, in Toledo, Ohio, and is held on the final weekend in June. The garden grounds are a beautiful setting, and the artists and visitors, alike, are treated with respect and inspiration! Hours, on Friday, are from 6 til 9 for the artists, and 6 to 10 for those who have purchased the $75 entrance ticket. On Saturday, the hours are from 10 until 7, and on Sunday, 10 until 4. Visit the Garden's website for more information on entrance fees, parking, shuttles from parking, and handicap service. http://www.toledogarden.org/crosby-festival-of-the-arts-2015/ or toledogarden.org
Tuesday, October 14, 2014
I have had two pieces accepted into the Michigan Ceramics 2014 Exhibition!
 |
| tulip holder |
 | ||
| hanging landscape platter |
The MCAA Biennial Exhibition and Competition is taking place this fall--October 17 to December 31, at the Saginaw Art Museum in Saginaw, MI. The reception and awards for exhibiting artists will take place on October 17th, and on October 18 there will be a workshop with the juror, Andrea Gill. The show will then move to the Dennos Museum Center in Traverse City from January 25 to May 17, 2015. More information is available at the Michigan Ceramic Art Association site: www.michclay.com. (latest news: I was awarded the Functional category award!)
Saturday, August 16, 2014
The residing of the studio is done!

A number of years ago we began residing the old T-111 on my studio with stained cedar clapboards. Yesterday, with the help of the three Bieber young men from down the road, we (is that the royal 'we', again?) finished the final side! Yea!

Wednesday, August 13, 2014
the new iBook about pottery is ready!

The little oil jar that has been on my postcard, and in the Symphony ad for the Toledo Symphony, is one of the pieces that was chosen for the 3-D display! I hope you will enjoy it!
Thursday, August 7, 2014
raising money


Sunday, July 6, 2014
The 2014 Ann Arbor Fair

here are some links to the art fair, itself: www.artfair.org
Monday, March 31, 2014
Potters for Pets: a fundraiser

Join
Saturday, April 5 at 5:00pm
Manabigama Pottery Center in Bowling Green, OhioSaturday, September 28, 2013
summer fairs are over


Tuesday, August 13, 2013
a great honor!

Friday, July 12, 2013
I'm showing at the Original Art Fair in Ann Arbor!
and here is the link to copy and enter in your browser: https://workspaces.acrobat.com/?d=Bi8tCY0JmZALgV*MnZk8jQ
or the link to click on:
Ann Arbor Original Art Fair, booth A-257
I am by the bell tower, Booth A-257, on Ingalls Mall, between E. Washington, and North University. The Fair runs from the 17th of July through the 20th; hours are: W - F: 10 - 9, and Saturday: 10 - 6. See you There!
or the link to click on:
Ann Arbor Original Art Fair, booth A-257
I am by the bell tower, Booth A-257, on Ingalls Mall, between E. Washington, and North University. The Fair runs from the 17th of July through the 20th; hours are: W - F: 10 - 9, and Saturday: 10 - 6. See you There!
Thursday, June 6, 2013
So, Finally, I got my kiln rewired!...

So, Finally, I got my kiln rewired!! And it wasn't really all that hard. (Remember how bad it used to be? Elements looping down along the inside wall, totally out of their grooves? It was still reaching temperature, until that fateful firing during Art-O-Matic in Toledo this spring......) So I finally ordered the replacement parts to do the entire set of 6 elements (but not the switches--they were fine) I also ordered a replacement kiln sitter ceramic sleeve. They came from Runyan Ceramics in Clio, Michigan. When they came, I set aside a day to work on the kiln. It all went very well (and thanks to Paul at Runyan's for the technical advice!) I just wasn't able to cut off the end of the loops on each end of each element, nor crimp the sleeve that goes over the element wiring and the wiring to the switch, connecting the two. So, I got Bruce to do that for me (though I understand, from my friend Robert Rueger, who roasts coffee and sells it at the Toledo Symphony, that there are $150 ratcheting crimpers which would do the job very nicely, without the bone-crunching effort.) Now the kiln not only looks good; it fires like greased lightening.
Sunday, April 28, 2013
demi-lune, in progress


Tuesday, April 16, 2013
Yunomi Invitational--more to come--opens on Friday, 19 April 2013

4/19/2013 - 5/17/2013
2013 Yunomi Invitational
(ONLINE ONLY) 200 Potters, 5 Yunomi each for AKAR's 2013 cup show. Donations to Studio Potter Magazine.
the show is open, now, and work is selling!
2013 Yunomi Invitational
(ONLINE ONLY) 200 Potters, 5 Yunomi each for AKAR's 2013 cup show. Donations to Studio Potter Magazine.
the show is open, now, and work is selling!
Wednesday, March 20, 2013
a landscape tile--a second look

In the early evening, as the sun is going down, and the light through the west windows is warm and encouraging, I sometimes sit in the old chair that my dad used to sit in (with his kitty, Gus, who now lives with Janet Kelman) and share a glass of wine with Bruce, and take a moment to reflect on what I'm doing, and at such a breakneck pace. I often miss seeing things that I might really like, but for the fact that they didn't sell last season, and are now hanging on the wall just opposite the chair, and, hmmmm.....so I have the chance to take another look.
Monday, February 18, 2013
Oval forms: final finishing work-----Part three
 |
| a. smoothed and ready for the handles |
Then I pull long coils, and twist two together. Two lengths are cut simultaneously, so that they will be even, and with a little vinegar I add them to either end of the casserole form (illustration 'b'). These are the 'braided' handles.
 |
| b. adding the handles |
 |
| the finished leatherhard form |
 |
| c. the under side of the casserole, which is glazed and decorated.. |
Tuesday, February 12, 2013
Oval Forms; slab-built: part two
 |
| cutting out the patterns |
 |
| bevelling the edge |
Once I've tested the patterns with an actual clay trial form, and know that the patterns are going to work, I roll out a clay slab, flipping the slab over each time I roll it. To keep the slab even, I use two 1/4 inch dowels on either side, like train tracks, on which the rolling pin can roll. The table surface is a piece of granite, smooth, and slightly absorbant. The sheeting (part polyester--doesn't wrinkle as much....) makes it easier to lift the slab, each time it's rolled out, so that I can flip it over before I roll it out, again. Then I cut as many forms out of one slab as I can fit--I hate having to recycle the slabs if I don't have to! The oval base goes into the bottom of the plaster mold, and its outer edges are pressed and thinned once the base is in place. The side pieces get a bevel cut at each end, where the ends will overlap each other. The top edge of the curved side piece is smoothed, now, as well.
 |
| placing the cut shapes into the mold |
Once all the pieces are in place, (I scrub the areas to be joined with a toothbrush dipped in vinegar) they're smoothed down, and pressed against the bottom and side with my fingers. I also put a soft coil around the oval, at the inside base of the piece, and up the sides at
the joining of the two sides.
 |
| fitting the side pieces on top of the base |


Sunday, February 10, 2013
Oval forms; slab-built
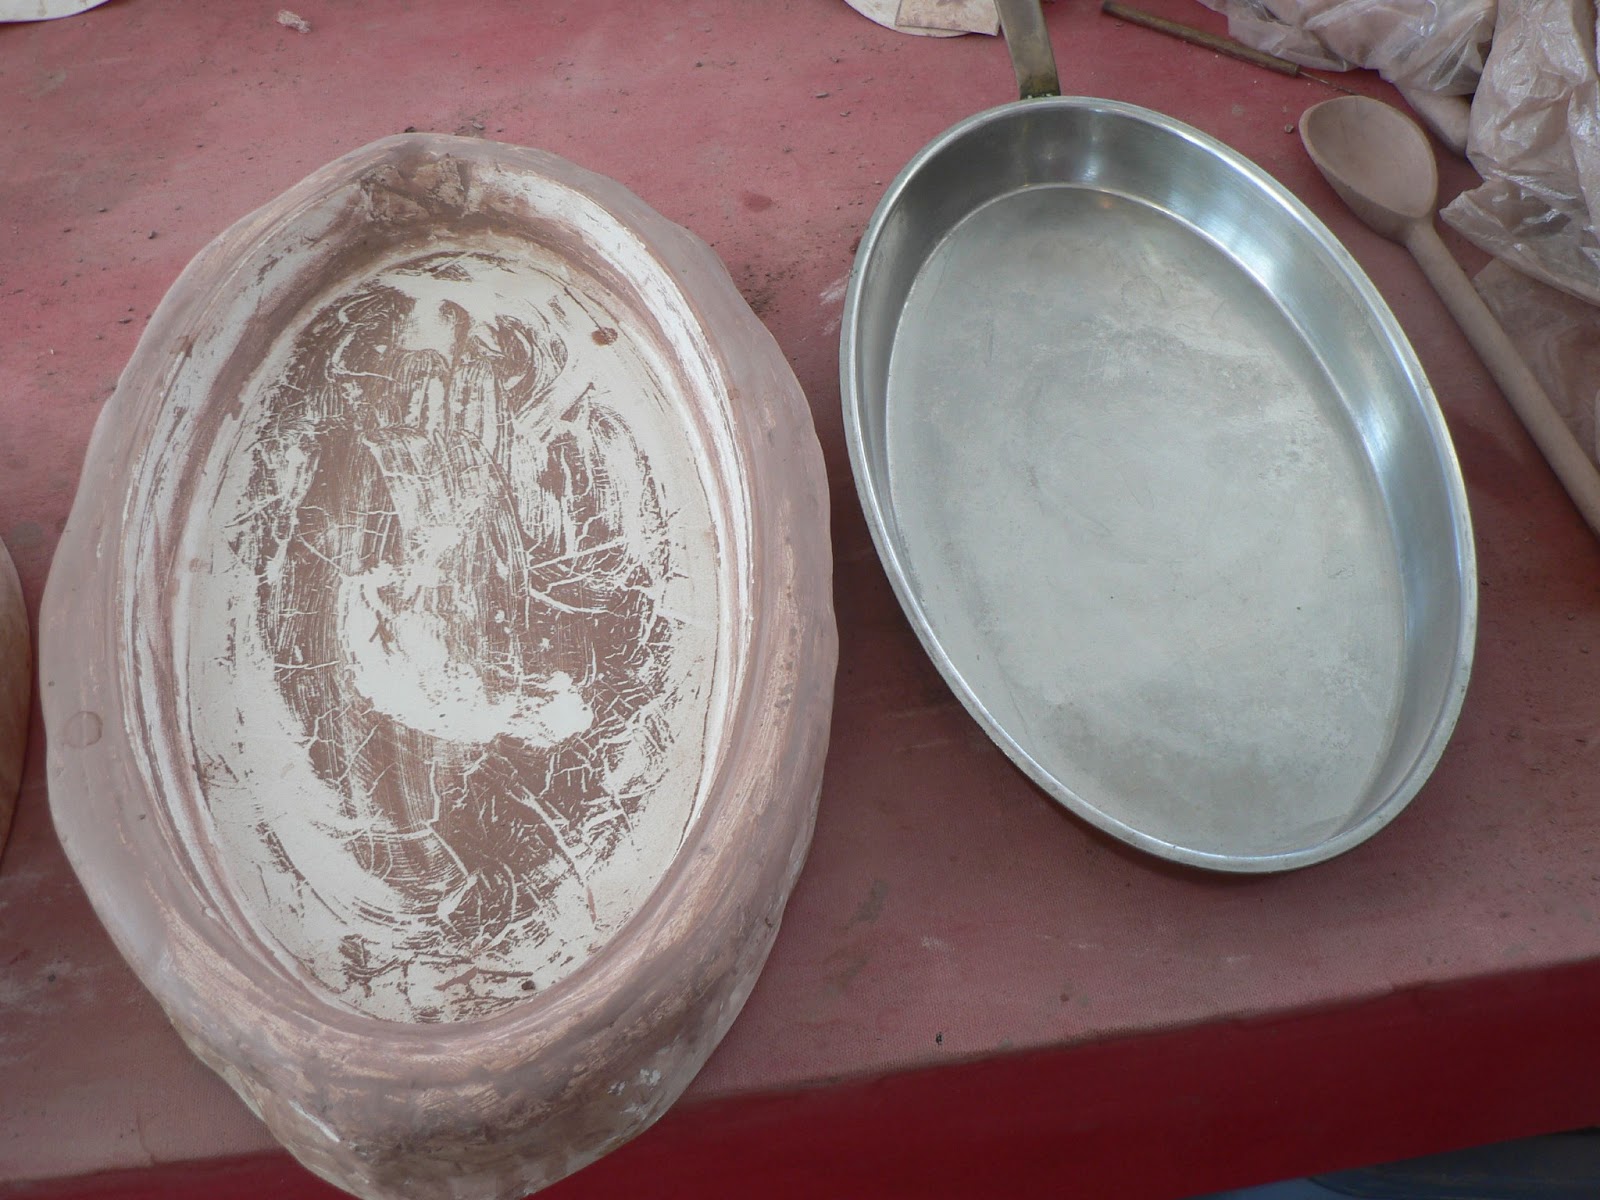 |
| this first form was cast from a flat pan (seen to the right) |
 |
| some of the oval shapes I work with; the one on the right is the commercially made mold |
In order to make the patterns, I first work with a lightweight paper like newsprint. To start, I push a slightly larger oval piece of paper into the bottom of the mold. Then I run my fingers around the outer edge of what I perceive to be the bottom until I can see where to cut the oval base shape. Then I take a pencil and draw the cutting line, and then cut the shape, itself. I then do the same thing with one-half of the side. The shape of the side is something like the shape of a lampshade that is laid out on a flat surface. It's like a rhomboid (OK, not really, but...) with a curved top and bottom edge. These first thin paper patterns are done on a trial basis, and, after using them to cut out the initial clay forms, and after pressing the clay forms into the plaster mold, adjustments can be made so that the pieces fit together more precisely. The third image, here, below, shows the final patterns, (along with one of the finished and fired pieces). The final pattens are made from a sort of plastic paper: impossible to tear, and fairly easy to cut with sharp scissors. It was 'paper' given to me when I was a den mother for Pete's cub scout group. I was never able to figure out what to do with it with the boys, but, years later, I discovered that it made good patterns for cutting out clay shapes. It's strong enough to be laid on wet clay without wrinkling up, and strong enough to have a needle tool run around its outside edge, over and over, without distorting. In the next post, I'll show how the clay is cut and placed into the plaster mold.
 | ||||
| Here is the mold (which I call 'long'), with its patterns, and with the finished pot |
Saturday, February 2, 2013
mid-winter gallery displays, part 2---
 |
| The American Gallery |
Sunday, January 27, 2013
a new shape
 |
| the new plate shape |
Friday, January 25, 2013
patterns for inspiration--from Alisa


Monday, January 21, 2013
Mid-winter gallery displays, part 1
 |
| my work on the beautiful cherry table at the Hudson Gallery, downtown Sylvania, OH www.hudsongallery.net |
Tuesday, January 1, 2013
 |
| demi-lune finished in late November, 2013 |
Friday, December 28, 2012
just before the studio sale---

Friday, November 9, 2012
Sale of Edith Franklin's final works, tools, memorabilia, and donations of other artists' works
- 1:00pm until 4:00pm
The Secor Gallery, 425 Jefferson Ave., Toledo, OH 43604
Celebrate the life of Edith Franklin and help support Edith's life and work, and the Youth Arts Fund she created to ensure the promise of Toledo's young artists of the future. Join us as we celebrate at the Secor Gallery, 425 Jefferson Ave., Toledo on Sunday, November 11 from 1-4 p.m. Selected archival works by Edith and personal mementos will be sold at her request, along with other local artists' works donated in her honor. All event proceeds go to the Edith Franklin Youth Arts Fund at the Toledo Community Foundation. Donations to the fund may be made at the event or mailed to The Arts Commission (1838 Parkwood Ave., #120, Toledo, OH 43604). RSVP requested, 419-254-2787.
Sunday, September 30, 2012
selling my potter's wheel chair
I am selling a potter's chair/stool which I
bought to use with my sit=down wheel (when my hip/back was bothering me)
Now that I have had hip replacement surgery, I no longer need the
chair, and am selling it on ebay--if you go to the ebay link and enter
290782517949 in the search box, you can see the link------
Saturday, September 29, 2012
Studio Repairs
 |
| shakes are going up on the gable end (to match the house) |
 |
| Tar paper, before the cedar clapboards |
Sunday, September 23, 2012

Thursday, August 23, 2012
I SHOULD be throwing mugs, but....
the leather hard tiles, back in 2010, when I was musing about where they would go
For a number of years I have wanted to fix up the top surface of the old Steelcase desk that has been in my studio. It actually belongs to our son, Pete, but I am 'storing' it, and have painted the drawers and sides. But the top remained a little raw, so this week I decided to tile it. I had done tiles (4" hexagonal, unglazed, fired to cone 2) which I thought I might adhere to the foundation of the house up by the porch. But I only had enough to do one section, and once I started looking at the area, I realized that I had an old farmhouse on fieldstone foundations, with a kind of cement covering to the foundation, and the tiles would be out of character, and I probably would need years before I got enough done to do the whole house. Instead, I decided to tile the top of the desk! I wanted it to remind me of the old tile floors in France---
 |
| the finished desk top |
 |
| buttering the back of the tile |
 |
| spreading more mastic |
 |
| setting the tile into the mastic |
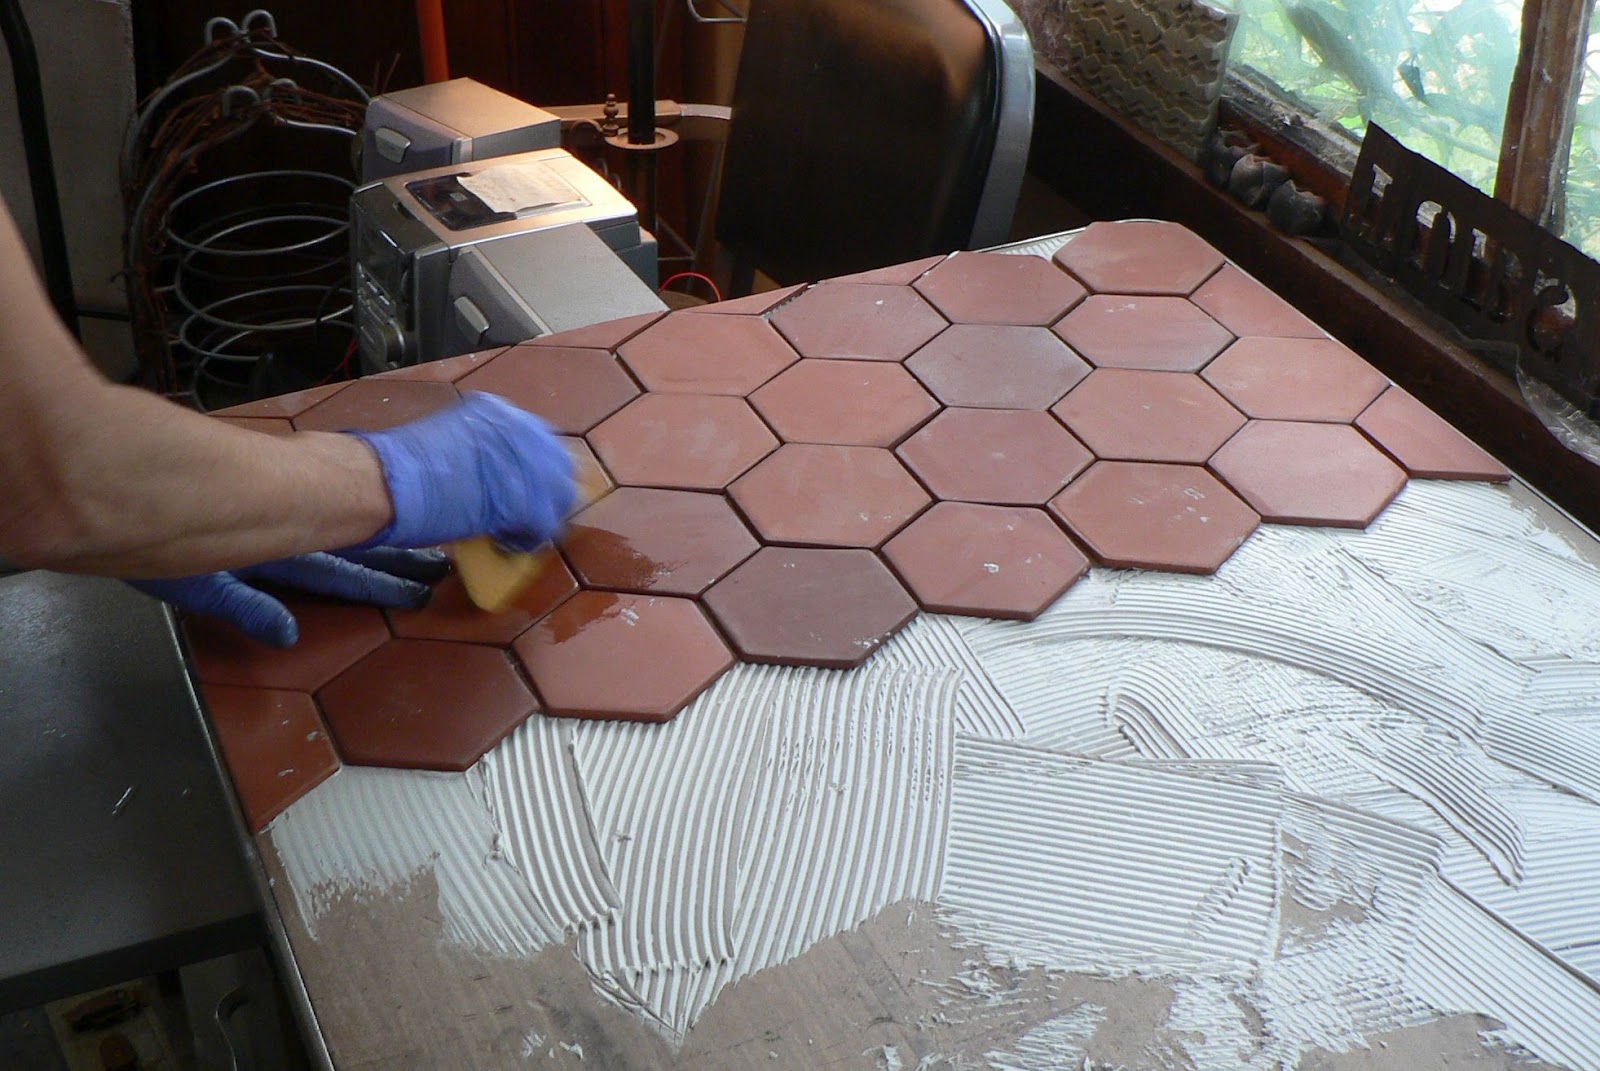 |
| wiping off the extra mastic. |
Subscribe to:
Posts (Atom)