Thursday, August 23, 2012

I SHOULD be throwing mugs, but....

the leather hard tiles, back in 2010, when I was musing about where they would go
the finished desk top
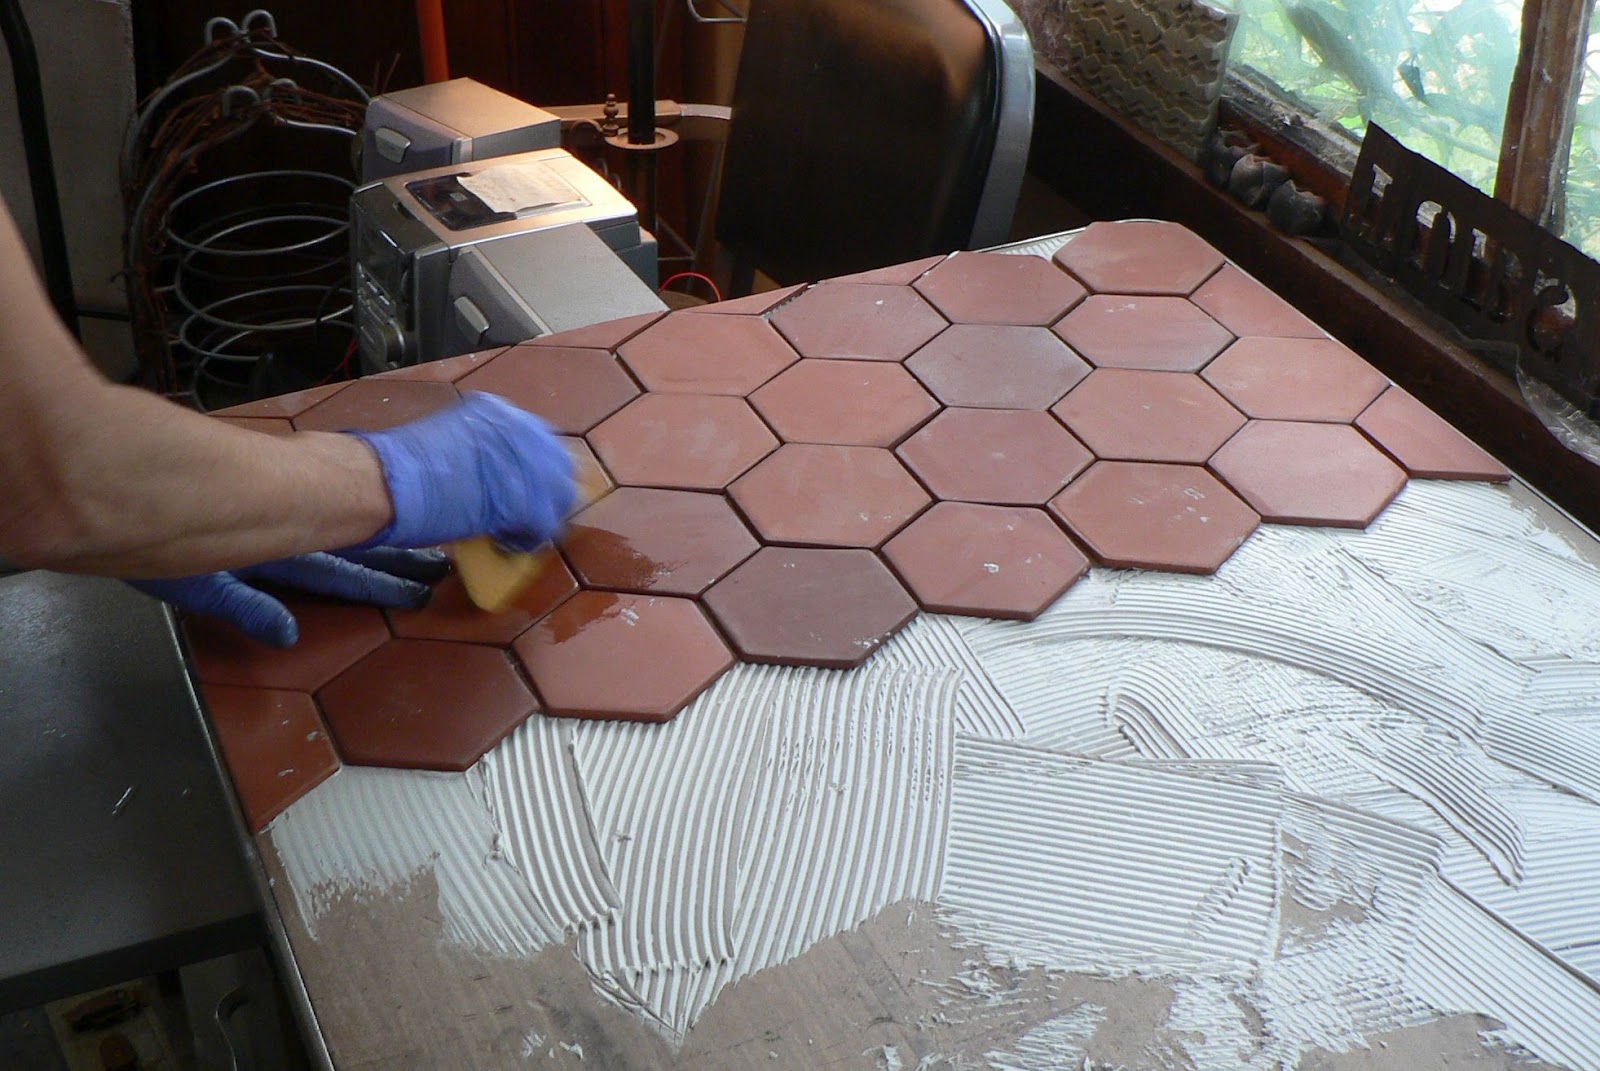
buttering the back of the tile
spreading more mastic


setting the tile into the mastic

wiping off the extra mastic. 
For a number of years I have wanted to fix up the top surface of the old Steelcase desk that has been in my studio.  It actually belongs to our son, Pete, but I am 'storing' it, and have painted the drawers and sides.  But the top remained a little raw, so this week I decided to tile it.  I had done tiles (4" hexagonal, unglazed, fired to cone 2) which I thought I might adhere to the foundation of the house up by the porch.  But I only had enough to do one section, and once I started looking at the area, I realized that I had an old farmhouse on fieldstone foundations, with a kind of cement covering to the foundation, and the tiles would be out of character, and I probably would need years before I got enough done to do the whole house.  Instead, I decided to tile the top of the desk!  I wanted it to remind me of the old tile floors in France---

Saturday, July 21, 2012

My work at the Ohio Craft Museum, Columbus, OH

I have work at the Ohio Craft Museum in Columbus, OH, http://ohiocraft.org/  and Ann Starr, in her recent blog, reviewed the work--here is the link for her blog!   http://starr-review.blogspot.com/

upgrading the exhaust vent window 'exit'

new way of exiting the hot exhaust pipe from the kiln

Many years ago (15, more or less) when I bought my new kiln, I added the "enviro-vent" to the base of the kiln, and vented the kiln, via a rigid 4" metal pipe, to the outside of the studio.   At the time, and with my limited skills in construction (but fertile imagination as to how something might be), I fashioned a way of taking the exhaust pipe out through an adjacent window without having to break any glass, or do too much fussing.  I opened the window, and then inserted a 2" piece of rigid foam insulation, into which a 4" hole had been cut, at the bottom edge.  Then I put the pipe through this hole, and voilĂ !  The pipe exited the building without much fuss----with the pipe essentially rested on the wooden window sill.  As time passed, however, and as I changed out the rigid pipe for a flexible pipe this last year, I felt, more and more, that the temperature of the pipe was fairly hot, and that my method of construction wasn't the best. I also knew that wood, exposed to high heat over time, undergoes a change, and eventually has a lower flash point for catching fire.  SO, about 2 weeks ago, during one of our increasingly hot spells, and as I was starting the last kiln, I convinced Bruce to help me put in a safer exit hole for the exhaust pipe.  He found a collar from one of our woodstoves (we used to heat both the house and studio with them) which wasn't being used, and which was large enough for the piping to pass through.  Then we took off the (black) plastic from the outside of the window, and the styrofoam from the inside, shut the window, and removed a pane of glass.  On both the outside and the inside of the window, just slightly larger than the pane of glass, he put two pieces of plywood, into which a hole had been cut, large enough for the insulated stove collar to fit. Now the hot piping no longer touches either the wooden sill, or the styrofoam.  When winter comes, and I need to cover the window, again, I'll be making more changes........

Thursday, July 19, 2012

layering patterns for 'surface depth'

As I decorate a pot (the large flower pot, from the last post), I follow a series of decisions.  The first has to do with what 'theme' I'll use on the pot:  lemons, olives, hand with red pears, part of another decorated plate, etc.  Then I usually work with the largest forms for that particular theme, and lay down the lightest, largest color shapes, setting the pattern (or, working out what I might want the pattern to be) for the shape that I'm decorating. For example, I'll do lemons, and leaves, first, then smaller forms (grapes or olives, branches, and stems, and thin grey leaves).  The background is the last to be considered, and is sometimes, but rarely (these days) left entirely white.  I want the viewer's eyes to travel around the space, and I want there to be a sensation of depth, so I decorate the 'white' areas with smaller lines and swirls.  Low fired maiolica has a tendency to be flat in appearance; the glaze and clay, fired to cone 03 or 04, do not fuze to the extent that a cone 2 maiolica firing does (and I fire to cone 2).  So, in addition to the higher firing, I then add smaller lines, dots, and swirls with a very fine brush, or very small brush, or with a brush that has been opened up so that the bristles paint two closely parallel lines.  I also shade, with a pale taupe, each of the larger forms before I add the final black lines that go around the shapes.

Sunday, July 15, 2012

loading the kiln in summer

the kiln gapes open in the background, waiting to eat up whatever I can decorate

after the kiln is loaded, the colors are scattered and drying out
I seem to be slower, this summer, but am about to finish loading a glaze kiln!  There are some orders in this firing, along with work for the next fair, in August. Because of my hip surgery, I've not been going to fairs in July, but will start, again, next month. Maybe it's also the heat and drought, this summer, that's slowing me down.....

Sunday, June 24, 2012

Setting up, and Saturday at the Fair

Jared, Steven and Raymond Bieber do all the unloading for me!

Edith, Doug, and Bruce, in the back of my booth, Saturday
More Crosby Gardens--I had great help setting up, and being at the fair!  The weather's been great, too--now if the rain will just hold off until we've packed up, this evening!

Thursday, June 21, 2012

Everything's all packed---

some of these boxes go back a ways....

new pattern and mug shape
 All the pots are loaded into their boxes, and Bruce and I will pack them into the van this evening.  Tomorrow our neighbors, Jared, Steven and Raymond Bieber, will help us unload the van, and then unload the pots.  I'll have to decide where they go (something I never really know!  It always seems enough that I get them made.  Now, I have to arrange them on the shelves in display, too!!!...)
unloading the kiln; a little 4-legged tub decorated by Juliana

Wednesday, June 20, 2012

First Fair of the Season!

matted mini tiles

shakers

candle holders (finished, in front, glazed but undecorated or fired, behind)

succulent wall tile
Yikes, am I ever ready?  The Toledo June fair, locally known as Crosby Gardens Festival of the Arts, http://toledogarden.org/content/events/ begins this Friday evening at six p.m., though there are always early arrivals---I am unloading a kiln this evening, and packing all the pots in the studio.  Tomorrow my friend, Pat Ligibel, will come over to help finish the unloading, sanding of the pots' bottoms, and pricing.  Today, Pat McGlauchlin helped Bruce and me set up the tent and shelving.  And more help is on the way!  I'm really grateful for all the help, Thanks, everybody!!!!  since, this year, I had hip replacement surgery about three weeks ago, and, though I no longer walk with a rolling gait, I still am not fully recovered!  I've been working on some different ways to present work: little tiles have been matted, and I took advantage of an idea being marketed by Aftosa--hanging succulent boxes.  We'll see how they go---more photos, tomorrow.

Monday, March 12, 2012

the image revealed


Finally,  carefully lift the inked paper from the tile, and check to be sure that all the ink has transferred.  If not, you may want to replace the print and continue to rub.

Saturday, March 10, 2012

transfering the image---


Next Step:  carefully place the inked and wet (thus, fragile) piece of xerox paper onto a glazed surface--a tile, in this case--and smooth out.  You can also rub the surface with a blue rubber rib--gently, and with a little gum on it--since the paper has a tendency to tear. 

Friday, March 9, 2012

Inking the print


The next step is the inking of the gummed xerox---(I'm using another drawing in this stage; you'll see both transfers at the end).  The 'print' can be washed off inbetween inking by flooding the drawing with water into which some gum has been splashed in (about 1 Tbsp.).  I find this easier to do in an old bucket, rather than on the table top.


Sunday, February 26, 2012

First stages of planographic printing on unfired glaze


Here are the first steps to making a transfer of a drawing onto the glazed surface of a pot:  put a little CMC gum onto the surface of the xeroxed drawing, then rub it around.   A little of the gum under the drawing, as well, will keep the paper from slipping around.  The mixed ink  (linseed oil and mason stain) is already mixed, and is now in a little puddle on the glass plate.

Thursday, February 16, 2012

Printing on glazed ware

a mask in progress, with a transfer, on the left, of Bruce, and, on the right, of a student jumping rope

linseed oil and mason stain (peacock)
                It's February, already; where is the winter going?  I'm working with xeroxed images of some of my photographs, and glazed mask shapes, trying to put them together.  Online, I've seen a process which uses linseed oil mixed with a colorant/mason stain as the 'ink'---it's a planographic printing process, (as is lithography) using gum and water to cover and protect the areas of the xerox which do not have any ink.  But the demonstration, online, is showing the printing taking place on leatherhard clay, not on an unfired glazed surface (here's the link:  http://ceramicartsdaily.org/ceramic-supplies/ceramic-colorants-ceramic-supplies-2/photo-lithography-on-clay-a-surprisingly-simple-way-to-print-images-on-clay/)  The mask is not yet fired, not even yet finished.  The tiles to the right are tests, and fired.  More on this as I continue with the testing---

Sunday, December 4, 2011

a visit to Rovin Ceramics


Rovin Ceramics, formerly of Taylor, Michigan, is now located just to the west of Ann Arbor.  My friend, Pat Ligibel, and I went out in November to pick up some clay and glaze chemicals, and a few brushes--Juliana was at the desk and helped us with our order---

Friday, December 2, 2011

the Holiday Sale

Denise's handiwork sets off Margaret's jewelry!
Margaret arranges pottery--her work is the beaded jewellry
We're halfway through the always interesting Holiday Sale---how wonderful it is to see friends, and to talk about our work!  Denise and Indigo stopped by today with plates full of delicious treats--dates stuffed with cream cheese, and mushrooms stuffed with a pesto mix, and pumpkin pie squares and chocolate angelfood bites  (who knew there were such wonderful delights!  More photos tomorrow!

Thursday, November 24, 2011

pots from one bisque load

work, work, work!  the sale approaches!!!!
I've unloaded the bisque kiln and am about to wax the bottoms of all the pots (and the lidded areas), so that I can glaze everything.  Here's the procedure:  before I glaze, I wax, then wait for the wax to dry, (the longer, the better), then dip everything into a bucket of cool water (don't want to re-soften the wax), then wait til the pots dry a little and can accept the glaze, and then I glaze.  If the pots are too dry when they're glazed, they absorb too much of the glaze water, too quickly, and the glaze builds up unevenly on the surface of the piece, sometimes pinhole-ing and leaving areas that are too thick. In addition, I single-dip, so I can't re-dip where I think there might be a problem. On the other hand, if there is a little moisture in the pot (just cool when held up to your cheek--as you would a bone-dry piece, to see if it's dry enough to go into the bisque), then the water from the glaze enters the porous, bisqued walls a little more slowly, and the air exits less precipitously, and I don't have little pinholes all over the glaze (which have to be fixed before firing, so they won't show up, later.)  hmmmmm.  If you have questions about this  (better as a demo, I think) just ask.

Wednesday, November 23, 2011

the tiled chair circle

Here's the final look of the round piece of durock used in the chair seat---tile was set onto the durock using thinset, and then, when the tiles had dried, they were grouted.  It's one of those 'ice cream parlor' chairs.  P.s:  there are two entries for the "my father's T-square because I don't yet know how to move a previously started draft (started in October) to the current head of the list, so I simply copied and pasted it--thus, it appears twice....(and everything I do the the first's title automatically appears in the second one---conjoined twins......Oh, well....back to the studio where I am decorating many pots, in my usual frantic effort to have enough work for the studio sale in December.  Is everybody as behind as I am?  HAPPY THANKSGIVING, EVERYONE!

Tuesday, November 22, 2011

my father's T-square (cutting more cement board for tiles)

marking the durock for the first cut (with my father's T-square)
This is a lot of visual reference for a fairly simple procedure, but since the earlier post about cutting cement board (durock, and other trade names) has had a number of views, I'm repeating the process, here.  I also wanted to say a few things about my father's tools.  Before he died, one month shy of 94, he had passed on to me his tools--he was a heating and cooling engineer, and also made beautiful wooden furniture and smaller wall pieces (out of orange crate).  He had memory loss which began to affect his everyday work for about 10 years before he died; still, he was able to physically do a lot of different things, and was the main person helping me paint the old tables that I was tiling and taking to fairs to sell.  Here, I'm using his T-square to cut up a thin sheet of handyboard or durock (a cement board with fiberglass thread reinforcement).  I want to cut a circle, so I begin by cutting out a square, and then cutting off the 4 corners, and then nipping the extra with the old pair of pliers he gave to me.  I think the yellow cutting knife was his, too.  The cuts are made by scoring the surface of the board with the blade of the knife (fresh blades are good!)--pressing the blade against the metal ruler edge while dragging it across the surface of the board. Then I break open the cut by laying the cut along the edge of the table and whacking down on the part which hangs over the edge.  It won't be cut all the way through, so you need to score the back side, as well-----along the inside of the now folded line.  Once the cuts have made the circle round enough, able to fit into the chair circle, the circle of durock can then be glued down/or in to the chair form with some Liquid Nails.  It's also held there by bolts that come in from the outside of the round metal form.  I will post the final 'look' of the tiled chair on the next post. 
Breaking the board open after scoring the top side

marking for the second cut

cutting away the edges of the circle

nipping off the curved area between the straight cuts

fitting the circle into the chair base

Monday, November 21, 2011

similarities

gifts from friends!

attaching the clay for the knob
throwing the knob

I was just noticing the similarities between all the squash I've been given, of late (from Rickeye Heffner, Fritz Gehring, and Indigo Fleming-Powers) and the look of the handles I'm attaching, and then throwing, for the lids of all the honey pots......

Wednesday, November 9, 2011

Some of my new work at the Schaller Gallery in St. Joseph, Michigan

http://www.schallergallery.com/exhibition-list.php?id=73
Ursula Hargens Plate
Fall Haul

Wayne Branum
Linda Christianson
A Blair Clemo
Guillermo Cuellar
Ursula Hargens
Sam Scott
Andy Shaw
Ann Tubbs

 See the Show 

Think handmade for Christmas
 
Schaller Gallery
210 State Street
Saint Joseph, Michigan 49085