Friday, September 2, 2011

setting the tiles

small unglazed strips used for spacing
vinyl mastic on the top of the coffee table


tiles are set into the mastic
each tile is numbered

Pat checks the spacing for each tile


After all of the tiles were fired, my friend, Pat Ligibel, came over to help me set them onto the table top (see the previous post).  We used a vinyl mastic that's appropriate for tiles in this setting.  First, we laid out the exact number of tiles, and checked that the spacing was adequate.  Pat suggested that I had the tiles too close together, so we eliminated the thin outer edge spacers, and rearranged the tiles, again.  Then we carefully removed the tiles, placing them in order onto the canvas work top.  The plywood coffee table top was then elevated onto the work table, and covered with a thin coat of the vinyl mastic.  Then we started with the outer edge (bull nosed) tiles, buttering the back, unglazed area of each tile and pressing it into the mastic on the table top.  After the edge tiles, the center 4 by 4's were buttered and adhered (each tile had been numbered after the bisque, and before the waxing of the tile proceeding the glazing). Filler strips and little tiny squares were added last.  Now the top has been drying for several days. When it's completely set up, I'' put the top onto the base and we will grout it----

Wednesday, August 31, 2011

another table!

the tiles for the table, laying out on the actual surface
 I'm putting together another table--this one is an order from a good customer who already has had me redo another round table, similar in decoration to this one, and has asked for a re-working of one of her coffee tables.  I took off the existing top, and had a baltic birch piece of 4/3" plywood cut for me, at Toledo Plywood.  Then I painted it, top and bottom, with a latex black.  I'll mastic the tiles onto the table with a vinyl product.
The tiles are cut with a 4" by 4" tile cutter (see previous blog entry:) and dried, flat, between sheets of gypsum board.  They are laid out, after bisquing and glazing, in the form of the table, and then decorated.  Edge tiles were extruded, and cut with the same tile cutter.  I need to decorate and fire more of the little strips before I can glue the tiles down (b.)
(b.) black areas are the underlying board; I'll need to make more of the strips

(d.) extra leaves

(c.) leaves, instead of a tile, for interest

(f.) little spacer tiles and unglazed strips

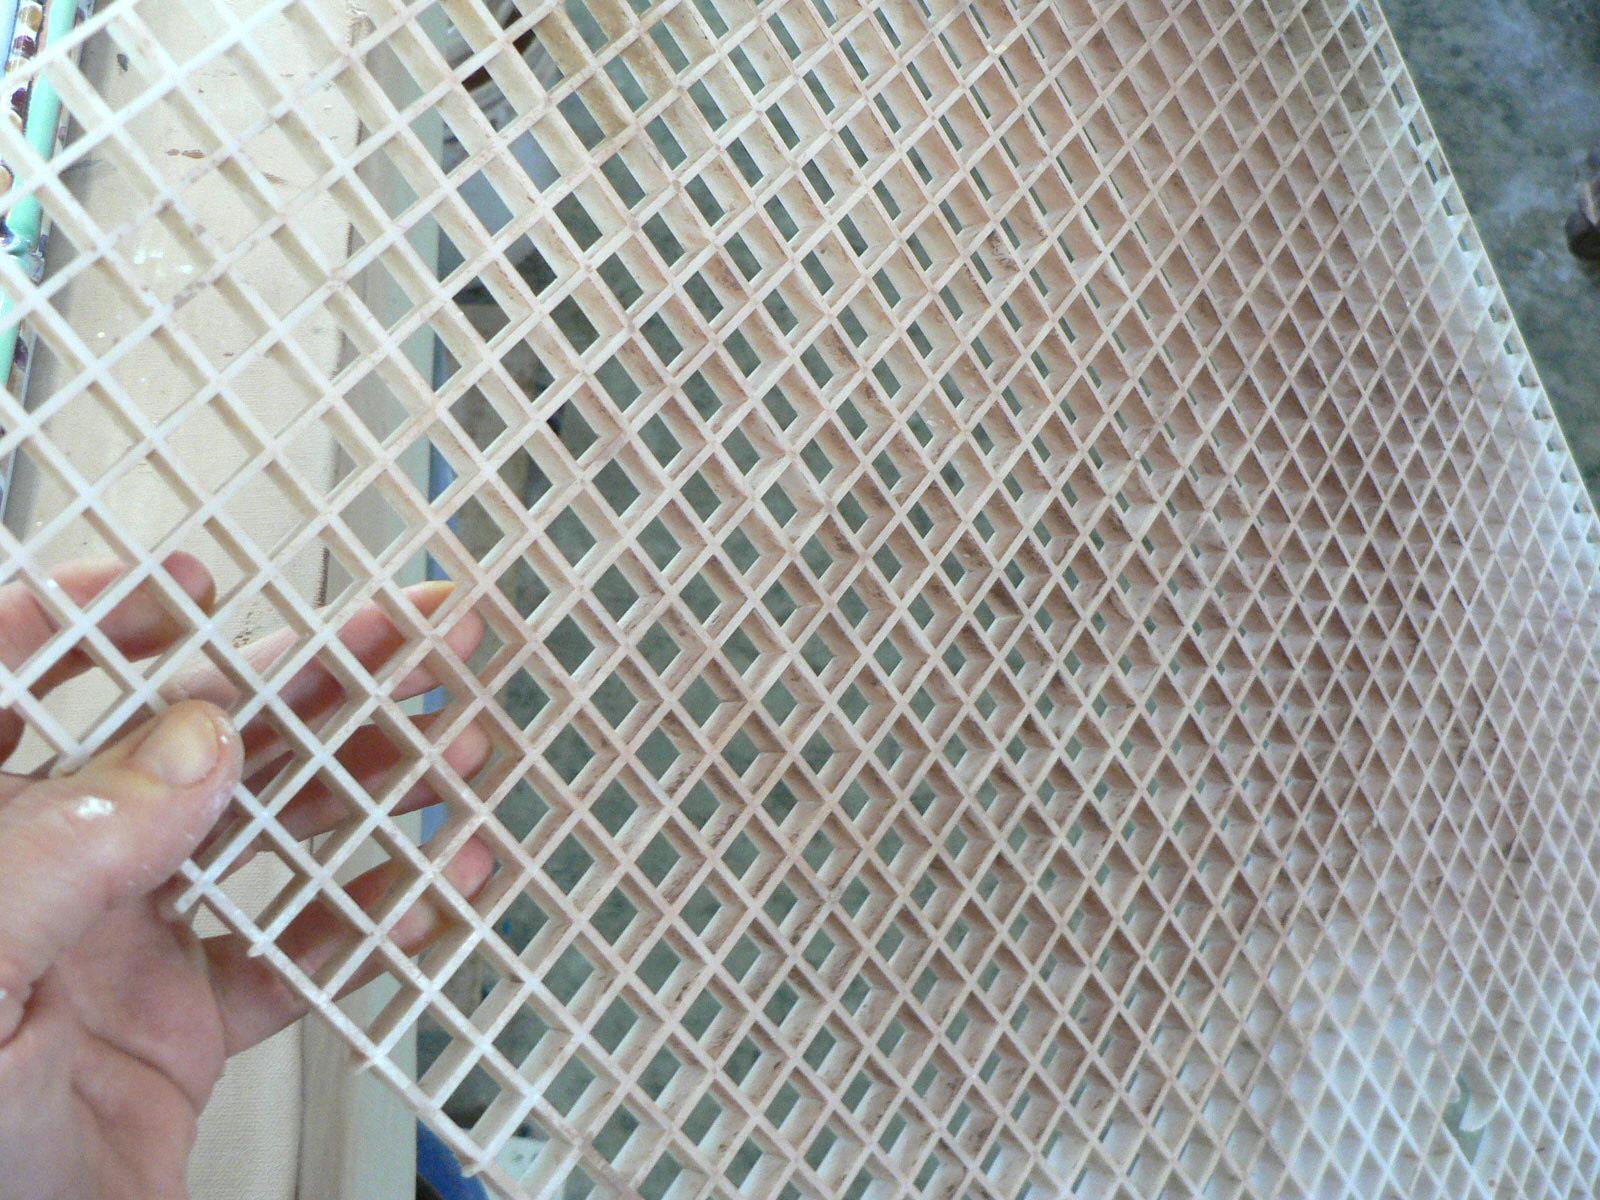
(e.) egg crate, from fluorescent lights: the template for the little square tiles
Here and there, to break up some of the 4-squaredness, I try out the insertion of some of the leaves(c.) which I make and save for tile projects (d.)  I also press clay into 'egg crate--the plastic 'screen' (e.) which covers a fluorescent fixture.  As the clay dries, the little squares drop out.  I bisque them all together in a bowl, and then wax and dip each one into the glaze.  Then, with tiny brushes, I decorate the top.  It reminds me of tiny petit-four cakes. (f.) The unglazed strips are the cut-offs from the 6 by 6" tiles,which are too big to fit into a commercially made wooden frame.  I have to cut 1/4" strips off of each side.  If I can keep these strips straight, then I can use them for fill-in strips when a glazed thin tile would be too wide.

Wednesday, July 27, 2011

finishing the hexagonal table

rubbing in the grout with the heel of my hand

wiping away the excess grout
 I'm finally finishing the hexagonal table.  This morning (it's not so hot, now) I took the table outside--I knew I was going to make a mess getting grout into the edge tiles, and I wanted to be sure I could get the table through the door.....
--and I mixed up the grout with the acrylic admix, then spread it across the table, pushing the grout into the interstices between the tiles with the heel of my hand.  I wouldn't normally do this outside, since the grout would dry too fast, so I had to work quickly.  After the entire table was 'grouted', I dampened an old sponge and began to wipe off the excess grout.  It took several passes, squeezing the sponge out as much as possible each time.  I didn't want to flood the table with water.  After most of the grout was wiped off with the sponge, I then used an old rag to wipe and polish the surface.  Finally, when the grout had dried enough not to be wiped out, I scrubbed the surface of the tiles with a green scrubbie.  After the grout has completely dried, I'll seal it with a grout sealant. The sealant is brushed onto the grout, and after a few minutes, is wiped off of the tiles. 
scrubbing off the film of grout, then sealing the grout

Wednesday, July 13, 2011

It's not Oklahoma, but........


the edge tiles

corner edge tile for the hexagonal table

numbering system for table tiles

hexagonal table
I'm firing a glaze kiln, and decided to take the thermometer out to the studio  (never a good idea; I'll get too depressed) to see just how hot it really was.  It was hot!!! about 110F.   Though a little cooler if you lay down on the floor.  -heat rises, you know.....Whew!  And that's why I don't keep a thermometer out in the studio anymore.  During the winter, it's toasty, but now, in the middle of a heat wave, it's just plain hot!  Still, I have to do some work out there. I threw 3 bowls, made 2 large and 3 small slab platters, a 4-legged bowl, a casserole, and threw 2 bottoms for more large pitchers.  This weekend I go off to another fair, and I want work to dry enough so that I can do a bisque as soon as I get back.  There's a lot of raw ware waiting on the shelves, but I thought I could turn out a few more pieces.  I am also setting up tiles for a hexagonal table---each tile is numbered before it's waxed and glazed, and extra little edge pieces are done generically, then fitted in after the firing.

Wednesday, July 6, 2011

it's summer!

the farm road across from my studio where I ride my bike

the farm, this year (with the roof/walls painted on the barn)
A year ago I did some sketches of the farm road across from my studio, where I walk and ride my bike, and, in winter, cross-country ski.  It's not 'exciting', but it's safe (very little traffic....) and it gives me time to ruminate when I'm working out a problem in the studio.  Here, for the farm tiles, I used 6" by 6" tiles, and mounted them in a frame which I'd backed with a piece of luan plywood.  The outer design of the image is a variation on the pattern that is on the floor tiles in the home where my nephew lives, in Lerici, Italy. The corn, which is growing on either side of the lane, is now high enough that I can't see out! 

Monday, June 20, 2011

final touches


finishing the throwing of the top section

And, now, the final throwing---I throw the top section in and up to the height I want it to be (in relation to the bottom section), and then:

leaving a thicker rim (a)

pulling out the pouring spout (b)

refining the pouring spout (c)

pitchers finished, with handles, now drying (d)
While the top rim is freshly thrown (a), I gently and slowly pinch out the pouring spout, thinning it and curving it outward (b and c). Then I wrap the pot in plastic wrap (dry cleaner's bags) to retard the drying and to equalize the moisture content of the pot.  The handle is the last to be added, and I do this as soon as the rim is strong enough to support my pulling of the handle from its edge.

Saturday, June 18, 2011

finishing the pitcher

centering (a)

throwing down (b)
collaring in (c)


throwing up (d)

 --continuing from the previous blog post:  once the collar/ring is centered (a), and well joined to the base form, I can begin to throw it into an integrated pitcher form.  First I throw the clay down to further join the top ring with the bottom form (b). Then I choke it inward (c), and lift it up (d), (e), leaving a thicker rim at the tip which will be used to pull out the pouring lip. After that, if there is any unevenness to the top edge, I cut it off with a needle tool while the wheel is still turning (f). 
cutting off the uneven top (f)

Wednesday, June 8, 2011

throwing two-part pitchers--stage one

throwing the ring (a)
scoring the top edge of the lower section (c)
scoring the top edge of the lower section (b)


upending the ring onto the lower section (d)

the two parts, together....(e)
joining the top clay to the bottom (f)

I'll try to do this in two posts (though I probably should have done a video)-----When I throw an especially tall form I have various ways of making it easier:  here I'll talk about tall pitchers.  First, I throw the bottom section and take it off the wheel, on its bat, to dry to a soft-ish leatherhard.  Later, when the bottom has stiffened slightly, I measure its opening, and throw an open ring (a) that will fit onto the top edge of the bottom half.  This ring is also taken off the wheel, while still on its bat.  Since I've left the bottom half on the bat, not yet cut off,  I don't have to re-center it.  I now put it back onto the wheel.   Then I take the thrown collar/ring and flip it upside down (d) and onto the moistened (b & c) top edge of the lower piece (centering it). After that, I cut the bat away from the ring (using fishing wire) and then smooth (f) some of the clay in the top ring downward, onto the bottom form---I do this both inside and out.  Now I have a taller piece:  the lower half is stiff enough, though thin, to support the upper half, and the upper half is soft enough to be thrown, still, without distorting the lower half (which I'll show in the next post).

Monday, June 6, 2011

channeling my inner Mick Casson

pitchers and large bowls
I've been working for the last 2 1/2 months on an order for a baptismal font and pitcher, so, as usual, am doing a variety of large bowls and pitchers.  In the next several blogs, I'll show some of the ways of throwing larger pitchers--something I've learned from several potters over the years, but the images and instructions I remember and have tried, myself, most often come from a book I have that was written by Michael Casson, the English potter.  It's called The Craft of the Potter, and has some very practical information.  The pitcher whose pouring spout I'm finishing off, here, is one that is thrown in two parts, with the second part (a ring) being added after the first part has set up.  When the pitchers are dry enough, I will pull their handles.  More, anon.

Saturday, May 21, 2011

oh, no! I broke it!

Paul Linhares' mug (which I broke!:()http://www.mudskipperpottery.com/


Steve Smith guards door at Wooster (is that an aura?)

About a month ago I was dragging something heavy (a plant pot, no doubt) across the porch, and I heard a crash!  I had vibrated one of my favorite mugs off of the potting table and onto the big pickle jar of Pete's that sits out on the porch!  Too Bad!  But it made me first think of an earlier post in which I talked about clay bodies, and then about going to Wooster, OH for the Functional Pottery Workshop.  The mug was one of Paul Linhares' ( his website:  http://www.mudskipperpottery.com/), who also fires a red clay body to cone 2, as I do.  Of course I bought another mug from him at the workshop, and then I asked him (again) about which clay body he was using--and he said that it was Laguna's EM 106.  I had mistakenly identified it in a previous blog as being from Standard Clay, which also has a very smooth, non-grogged red body  (103).  So I hereby stand corrected!  I still have to test more clay, however......

Wednesday, April 13, 2011

I'm off to the functional pottery workshop at Wooster, but.....

now at the Hudson Gallery in Sylvania, OH

first, here are several photos of the finished candle holders that I completed for Art-O-Matic, which has one more Saturday to go--this coming weekend, 11 am, to 11 pm, 16th of April---  (but don't look for me that late......), in downtown Toledo  (see previous post for links).  Next week I'll post some of the photos I've taken at the Functional Clay Workshop in Wooster to which I go every April, now, and where I was a presenter in 2007.  Lots of great potters, and lots of friends----a wonderful way to be inspired for the rest of the year!

Monday, March 21, 2011

Waiting for the wax

Soon, I'll be setting up for the Art-O-Matic show in downtown Toledo--This year it's in an old building on Washington Street, right across from the 5/3 Mudhens Baseball Stadium!
"For three consecutive Saturdays in April, more than 300 Toledo-area artists will take over two vacant buildings in Downtown Toledo, transforming them into the largest, most comprehensive and eccentric multi-media galleries in Northwest Ohio. From beginners to seasoned professionals, Artomatic 419! offers a vast array of painting, sculpture, photography, dance, live music, performance art, theatre, one-of-a-kind installations, live art demonstrations and much, much more. See it. Believe it. This is Toledo's arts scene in action.

April 2nd, 9th & 16th, 2011, 11 a.m. - 11 p.m.

407 Washington & 25 S. St. Clair (across from 5/3 Field)
Downtown / Warehouse District, Toledo Ohio

Be sure to join us for the Artomatic 419! After Party at The Event Center,
23 N. Summit St. 9:30 - midnight, each Saturday"

FREE & Open to the Public www.artomatic419.org

Candleholders, tiles, mugs and bowls
       I'm doing the show with Margaret Mazur and Carol Lehmann, and we have, thanks to Margaret's adroit choice, a 6 foot long countertop.  Carol and I painted the underside on Sunday, and did a reality check  (Margaret had photographed it, and I had taken measurements, but it's always good to see it in person.)  I'm doing some tall candleholders to go on top of the counter---they're here, on the AV cart, fresh from the fired bisque kiln, waiting to be unloaded, waxed, dipped in water and then dipped in glaze.  The stacks of 6" tiles, next to the candleholders, are also waiting to be waxed and will go with me to Ann Arbor on Saturday for a Maiolica glaze class at the Ann Arbor Potters' Guild.

Saturday, March 5, 2011

getting started (& if I were out there, working, I wouldn't be in here blogging.)

Juliana and Denise check out the clay

Juliana's clay and slip tests

Denise cuts one of her stencils

Denise at work

Denise

Juliana
I'm pretty sure I've talked about this aspect of working before, but, for me, it is a reoccurring phase of working:  how to get started on a big project, or simply how to go from one area of work  (like glazing) to another (like throwing).  There seem to be different mind-sets for different areas of work; maybe I feel it more in the maiolica work since there seems to be a jump from the forming, three-dimensional creating, to the somewhat two-dimensional work of decorating--even though I am decorating 'in the round', as it were.  Now and then I have friends who go through the same difficulty as I do, and this fall, my friend, Denise Fleming, who writes and illustrates children's books, said she just needed to get out of her studio and force-start (my words) a stencil-cutting job.  I was in the same place, needing to do tests of clay bodies, and slips, so I invited her over to my studio, and then talked Julianna Clendenin, potter, jeweler, seamstress, into coming over, too, to help me with the slip and clay testing--here are some photos of us working, and of actually getting those hard-to-finish jobs done......
So, thanks, Denise and Juliana, for getting me started!  I'm in that same place, now, I guess, and reading other people's blogs:  for example:    http://baumanstoneware.blogspot.com/2011/03/word-lite.html    has a good effect, as well.  (plus, as you can see, I've discovered captions for the photos!.....)  Technical details:  we're testing three red clay bodies from Standard Ceramics in Pittsburg, PA, which I got from Mike Taylor over in western MI--and, actually, the woman who works for him brought them over when she and her husband were visiting her parents!   Two of the bodies worked for me with my glaze at cone 2: (wait, I have to run out to the studio and look them up......!!)   OK, here are the ones that worked:    #104, and #417. The third, #103,  is a beautiful, smooth, red body used by Paul Linhares, an Ohio potter whose work I admire, and whose mugs I have--he says it is like working with red porcelain--so I had to try it.  Unfortunately, under my maiolica glaze, the tensions were dramatically uncooperative, and the little bowl test that I did cracked open in a spiral from the top edge down.  too bad!    ( I am currently using Rovin's RO82M which has a 40 mesh grog, and find it works very well, and is close by --- I can drive up to get it, in Taylor, MI---coincidental Taylors, here?) but always feel I need to test, since I am not currently making my own clay body.