Tuesday, August 23, 2011


Wednesday, July 27, 2011
finishing the hexagonal table
 |
| rubbing in the grout with the heel of my hand |
 |
| wiping away the excess grout |
I'm finally finishing the hexagonal table. This morning (it's not so hot, now) I took the table outside--I knew I was going to make a mess getting grout into the edge tiles, and I wanted to be sure I could get the table through the door.....
--and I mixed up the grout with the acrylic admix, then spread it across the table, pushing the grout into the interstices between the tiles with the heel of my hand. I wouldn't normally do this outside, since the grout would dry too fast, so I had to work quickly. After the entire table was 'grouted', I dampened an old sponge and began to wipe off the excess grout. It took several passes, squeezing the sponge out as much as possible each time. I didn't want to flood the table with water. After most of the grout was wiped off with the sponge, I then used an old rag to wipe and polish the surface. Finally, when the grout had dried enough not to be wiped out, I scrubbed the surface of the tiles with a green scrubbie. After the grout has completely dried, I'll seal it with a grout sealant. The sealant is brushed onto the grout, and after a few minutes, is wiped off of the tiles.  |
| scrubbing off the film of grout, then sealing the grout |
Wednesday, July 13, 2011
It's not Oklahoma, but........

 |
| the edge tiles |
 |
| corner edge tile for the hexagonal table |
 |
| numbering system for table tiles |
 |
| hexagonal table |
Wednesday, July 6, 2011
it's summer!
 |
| the farm road across from my studio where I ride my bike |
 |
| the farm, this year (with the roof/walls painted on the barn) |
Monday, June 20, 2011
final touches

 |
| finishing the throwing of the top section |
 |
| leaving a thicker rim (a) |
 |
| pulling out the pouring spout (b) |
 |
| refining the pouring spout (c) |
 |
| pitchers finished, with handles, now drying (d) |
Saturday, June 18, 2011
finishing the pitcher
 |
| centering (a) |
 |
| throwing down (b) |
 |
| collaring in (c) |
 |
| throwing up (d) |
--continuing from the previous blog post: once the collar/ring is centered (a), and well joined to the base form, I can begin to throw it into an integrated pitcher form. First I throw the clay down to further join the top ring with the bottom form (b). Then I choke it inward (c), and lift it up (d), (e), leaving a thicker rim at the tip which will be used to pull out the pouring lip. After that, if there is any unevenness to the top edge, I cut it off with a needle tool while the wheel is still turning (f).
 | |
| cutting off the uneven top (f) |
Wednesday, June 8, 2011
throwing two-part pitchers--stage one
 |
| throwing the ring (a) |
 |
| scoring the top edge of the lower section (c) |
 |
| scoring the top edge of the lower section (b) |
 |
| upending the ring onto the lower section (d) |
 |
| the two parts, together....(e) |
 |
| joining the top clay to the bottom (f) |
I'll try to do this in two posts (though I probably should have done a video)-----When I throw an especially tall form I have various ways of making it easier: here I'll talk about tall pitchers. First, I throw the bottom section and take it off the wheel, on its bat, to dry to a soft-ish leatherhard. Later, when the bottom has stiffened slightly, I measure its opening, and throw an open ring (a) that will fit onto the top edge of the bottom half. This ring is also taken off the wheel, while still on its bat. Since I've left the bottom half on the bat, not yet cut off, I don't have to re-center it. I now put it back onto the wheel. Then I take the thrown collar/ring and flip it upside down (d) and onto the moistened (b & c) top edge of the lower piece (centering it). After that, I cut the bat away from the ring (using fishing wire) and then smooth (f) some of the clay in the top ring downward, onto the bottom form---I do this both inside and out. Now I have a taller piece: the lower half is stiff enough, though thin, to support the upper half, and the upper half is soft enough to be thrown, still, without distorting the lower half (which I'll show in the next post).
Monday, June 6, 2011
channeling my inner Mick Casson
 |
| pitchers and large bowls |
Saturday, May 21, 2011
oh, no! I broke it!
 |
| Paul Linhares' mug (which I broke!:()http://www.mudskipperpottery.com/ |
 |
| Steve Smith guards door at Wooster (is that an aura?) |
About a month ago I was dragging something heavy (a plant pot, no doubt) across the porch, and I heard a crash! I had vibrated one of my favorite mugs off of the potting table and onto the big pickle jar of Pete's that sits out on the porch! Too Bad! But it made me first think of an earlier post in which I talked about clay bodies, and then about going to Wooster, OH for the Functional Pottery Workshop. The mug was one of Paul Linhares' ( his website: http://www.mudskipperpottery.com/), who also fires a red clay body to cone 2, as I do. Of course I bought another mug from him at the workshop, and then I asked him (again) about which clay body he was using--and he said that it was Laguna's EM 106. I had mistakenly identified it in a previous blog as being from Standard Clay, which also has a very smooth, non-grogged red body (103). So I hereby stand corrected! I still have to test more clay, however......
Tuesday, May 17, 2011
more tulip holders
 |
| at Red Lodge; click on third photo's caption |
 |
| off to Red Lodge Gallery http://www.redlodgeclaycenter.com/lists.php?aid=11&type=artist |
Wednesday, April 13, 2011
I'm off to the functional pottery workshop at Wooster, but.....
 |
| now at the Hudson Gallery in Sylvania, OH |

Monday, March 21, 2011
Waiting for the wax
Soon, I'll be setting up for the Art-O-Matic show in downtown Toledo--This year it's in an old building on Washington Street, right across from the 5/3 Mudhens Baseball Stadium!
I'm doing the show with Margaret Mazur and Carol Lehmann, and we have, thanks to Margaret's adroit choice, a 6 foot long countertop. Carol and I painted the underside on Sunday, and did a reality check (Margaret had photographed it, and I had taken measurements, but it's always good to see it in person.) I'm doing some tall candleholders to go on top of the counter---they're here, on the AV cart, fresh from the fired bisque kiln, waiting to be unloaded, waxed, dipped in water and then dipped in glaze. The stacks of 6" tiles, next to the candleholders, are also waiting to be waxed and will go with me to Ann Arbor on Saturday for a Maiolica glaze class at the Ann Arbor Potters' Guild.
"For three consecutive Saturdays in April, more than 300 Toledo-area artists will take over two vacant buildings in Downtown Toledo, transforming them into the largest, most comprehensive and eccentric multi-media galleries in Northwest Ohio. From beginners to seasoned professionals, Artomatic 419! offers a vast array of painting, sculpture, photography, dance, live music, performance art, theatre, one-of-a-kind installations, live art demonstrations and much, much more. See it. Believe it. This is Toledo's arts scene in action.
April 2nd, 9th & 16th, 2011, 11 a.m. - 11 p.m.
407 Washington & 25 S. St. Clair (across from 5/3 Field)
Downtown / Warehouse District, Toledo Ohio
Be sure to join us for the Artomatic 419! After Party at The Event Center,
23 N. Summit St. 9:30 - midnight, each Saturday"
FREE & Open to the Public www.artomatic419.org
April 2nd, 9th & 16th, 2011, 11 a.m. - 11 p.m.
407 Washington & 25 S. St. Clair (across from 5/3 Field)
Downtown / Warehouse District, Toledo Ohio
Be sure to join us for the Artomatic 419! After Party at The Event Center,
23 N. Summit St. 9:30 - midnight, each Saturday"
FREE & Open to the Public www.artomatic419.org
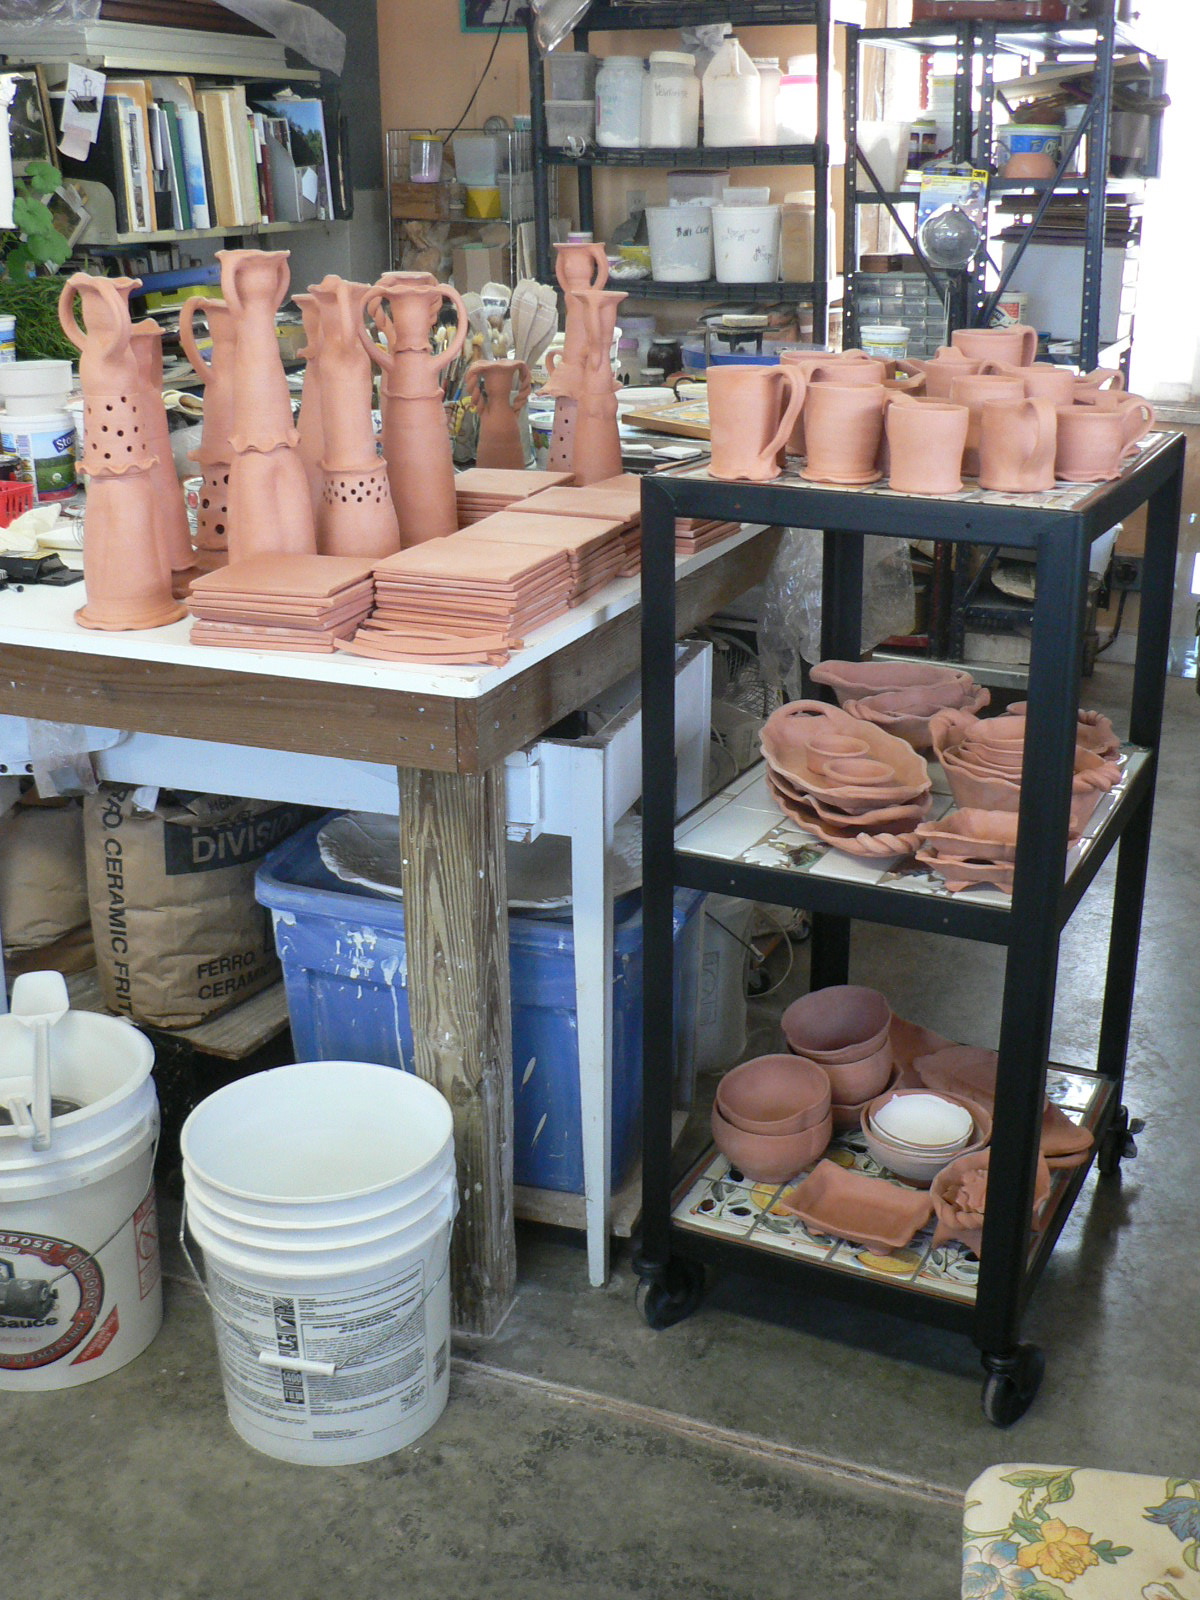 |
| Candleholders, tiles, mugs and bowls |
Saturday, March 5, 2011
getting started (& if I were out there, working, I wouldn't be in here blogging.)
 |
| Juliana and Denise check out the clay |
 |
| Juliana's clay and slip tests |
 |
| Denise cuts one of her stencils |
 |
| Denise at work |
 |
| Denise |
 |
| Juliana |
So, thanks, Denise and Juliana, for getting me started! I'm in that same place, now, I guess, and reading other people's blogs: for example: http://baumanstoneware.blogspot.com/2011/03/word-lite.html has a good effect, as well. (plus, as you can see, I've discovered captions for the photos!.....) Technical details: we're testing three red clay bodies from Standard Ceramics in Pittsburg, PA, which I got from Mike Taylor over in western MI--and, actually, the woman who works for him brought them over when she and her husband were visiting her parents! Two of the bodies worked for me with my glaze at cone 2: (wait, I have to run out to the studio and look them up......!!) OK, here are the ones that worked: #104, and #417. The third, #103, is a beautiful, smooth, red body used by Paul Linhares, an Ohio potter whose work I admire, and whose mugs I have--he says it is like working with red porcelain--so I had to try it. Unfortunately, under my maiolica glaze, the tensions were dramatically uncooperative, and the little bowl test that I did cracked open in a spiral from the top edge down. too bad! ( I am currently using Rovin's RO82M which has a 40 mesh grog, and find it works very well, and is close by --- I can drive up to get it, in Taylor, MI---coincidental Taylors, here?) but always feel I need to test, since I am not currently making my own clay body.
Saturday, February 26, 2011
It's Cold!


 We had an ice storm, followed by a snow storm, last weekend, and lost a lot of branches. Others did too, and we went without electricity for several days. Things got pretty cold! Work in the studio slowed wa-a-ay down. We put on all the clothes we could and still move around. The cats complained! My hands were so cold they turned blue....... But after a day or so, I could ski around the yard, and it really was beautiful (though destructive.)
 scroll to the Very Bottom to see another photo of the ice on the sumac :)
Sunday, February 13, 2011
the Show at the Clay Gallery in Ann Arbor, MI
 |
| Monica and Shirley, to the left and right of me |
 |
| Monica looks for holes in the wall to spackle |
 |
| Fletcher's Dream--a porcelain clay notebook |
Saturday, January 29, 2011
the compost pile in winter

Saturday, January 15, 2011
fixing the defects
Maiolica glaze does not move and heal during the firing process, and , in addition, because there is such a clear difference between glaze color (white), and clay body (red), things such as finger marks are very obvious and not well integrated into the whole after the glaze has been fired. Part of this is the fact that I fire in an electric kiln. I've often thought that firing in an electric kiln is a lot like cooking vegetarian. As an omnivore, it seems that one could simply throw a chunk of meat, along with veggies, into a pot and put it into the oven for an hour or so, and have a tasty meal, one whose flavorings were enhanced by the meat and its fat and juices. Being vegetarian (or using an electric kiln) means you have to be smart up front. Everything is in the preparation before the work goes into the oven (kiln). I remember Richard Zakin telling us about how to fire electric kilns and get good effects. You had to know about the clay body, and the glaze, and the colorants, and you had to use that knowledge before you ever got to the firing process. So, here are some examples of potential surface problems which, if left, would turn up, again, after the firing: pinholes (on the edge of a yunomi), and fingermarks--you can see the whorls of my fingerprint, and drips--on the waxed foot, and a small area that escaped being glazed. I will take the back of my fingernail and flatten the pinhole, then paint more glaze over it. The glaze for repair has been thinned somewhat with a mixture of cmc gum (helps with the flow) and macloid (keeps it from settling)--- (this is a Walter Ostrom technique which I also use to mix the colorants). Then I will smooth the edge of the platter that has my fingerprints, and paint more glaze over the bare spaces, feathering the 'patching' glaze into the main body of glaze. I'll then take a sponge and wipe the drips off of the waxed foot, and fill in the unglazed area (which shows the red of the clay body). It will take me several days to re-finish all of the pots that I want to decorate for the next kiln load. Sometimes the best time to see all the defects is late in the day when the sun is coming in the west windows of the studio---and lays long shadows over the glazed pots I'm working on. The defects--drips, and pinholes, sometimes hard to see in direct light--show up better.


Subscribe to:
Posts (Atom)